

Make a splash this summer with 25% off on Bundle of 42+ Elementor WP Themes. Use code “SUNNY25” to unlock the deal.
Sun's out, savings on! Enjoy 25% OFF on all Premium WordPress Themes with code “SUNSHINE25”
Make a splash this summer with 25% off on Bundle of 42+ Elementor WP Themes. Use code “SUNNY25” to unlock the deal.
Sun's out, savings on! Enjoy 25% OFF on all Premium WordPress Themes with code “SUNSHINE25”

In the ever-evolving world of e-commerce, creating a unique and engaging shopping experience for your customers is crucial. With countless online stores vying for attention, it’s essential to go beyond the ordinary and captivate your audience with a personalized touch. This is where WooCommerce custom fields come into play, offering a powerful tool to enhance your product pages and provide a tailored shopping journey.
As an online store owner, you’re likely familiar with WooCommerce, one of the most popular e-commerce platforms that power millions of websites worldwide. It offers a robust foundation for building an online store, but it’s true potential lies in customising and tailoring the shopping experience to match your brand’s identity.
WooCommerce custom fields give you the power to add extra information and unique data points to your products. These fields act as hidden gems, allowing you to display additional details, personalize product descriptions, and highlight key features that resonate with your target audience. By leveraging custom fields effectively, you can elevate your product pages to new heights, making them more informative, visually appealing, and interactive.
In this blog post, we’ll delve into the world of WooCommerce custom fields and explore how they can transform your product pages. We’ll discuss the importance of personalization in e-commerce and the benefits of utilizing custom fields. From showcasing product variations and options to integrating user-generated content and reviews, WooCommerce custom fields open up a world of possibilities.
So, let’s dive in and revolutionize the way you connect with your customers online!
WooCommerce Custom Fields is a powerful WordPress feature that allows you to add additional data and information to your products in an e-commerce store built with WooCommerce. These custom fields offer a way to extend the default product attributes provided by WooCommerce and provide a more personalized and tailored shopping experience for your customers.
In an e-commerce WordPress site, WooCommerce Custom Fields are commonly used for the following purposes:
By leveraging WooCommerce Custom Fields effectively, you can enhance the functionality and appearance of your product pages, provide valuable information to your customers, and create a unique and engaging shopping experience. These fields offer a flexible way to tailor your store to your specific needs and stand out in the competitive e-commerce landscape.
There are several methods to create custom fields in WooCommerce, allowing you to extend the functionality of your product pages and add additional information or data. We will explore two popular methods: using a plugin called “Advanced Custom Fields” and manually adding code to the functions.php file of your WordPress theme.
Creating WooCommerce custom fields using the “Advanced Custom Fields” plugin is a popular and user-friendly method that allows you to extend the functionality of your product pages with ease. This method is best suited for users who prefer a visual and intuitive interface for managing custom fields without the need for coding knowledge. It is particularly beneficial for store owners, developers, and non-technical users who want to enhance their product pages without delving into complex coding.
To begin, follow these detailed steps to create WooCommerce custom fields using the “Advanced Custom Fields” plugin:
You need to follow several steps to create WooCommerce custom fields using the “Advanced Custom Fields” (ACF) plugin. Installing and activating the ACF plugin on your WordPress website is the first step. This plugin allows you to easily create and manage custom fields for various purposes, including extending the functionality of WooCommerce.
To begin, log in to your WordPress admin dashboard. On the left-hand side menu, navigate to “Plugins” and click on “Add New.” In the search bar, type “Advanced Custom Fields” and press enter. The ACF plugin should appear as one of the search results. Click on the “Install Now” button next to the ACF plugin listing.
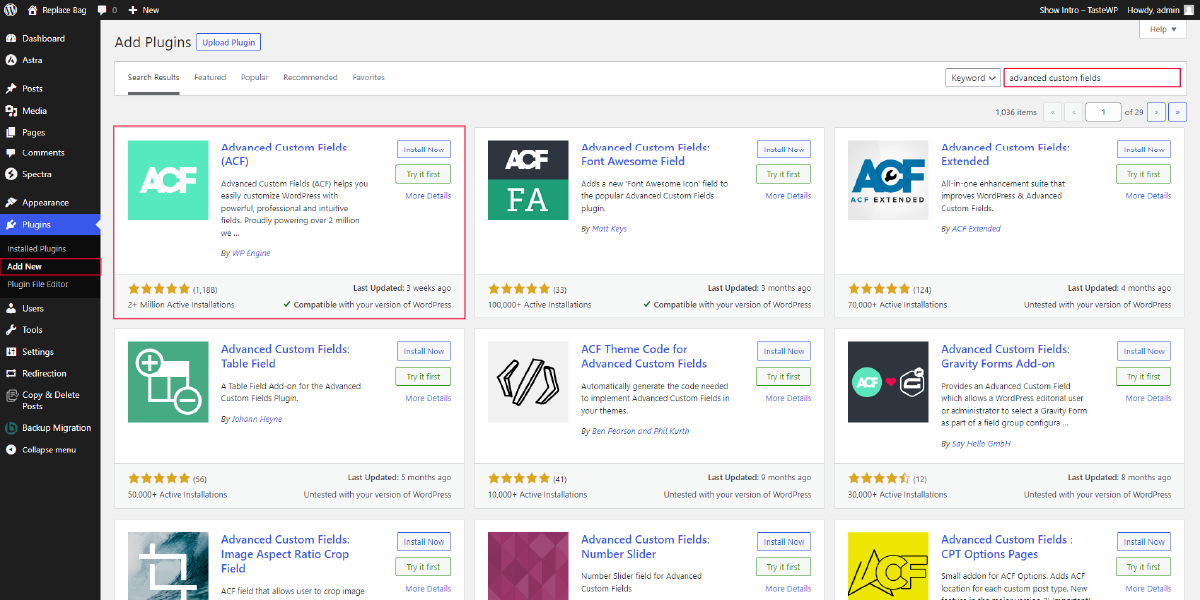
WordPress will now download and install the ACF plugin on your website. An “Activate” button will appear after the installation is complete. Click on it to activate the plugin. After activation, you will be redirected to the plugins page, where you can see the list of installed plugins.
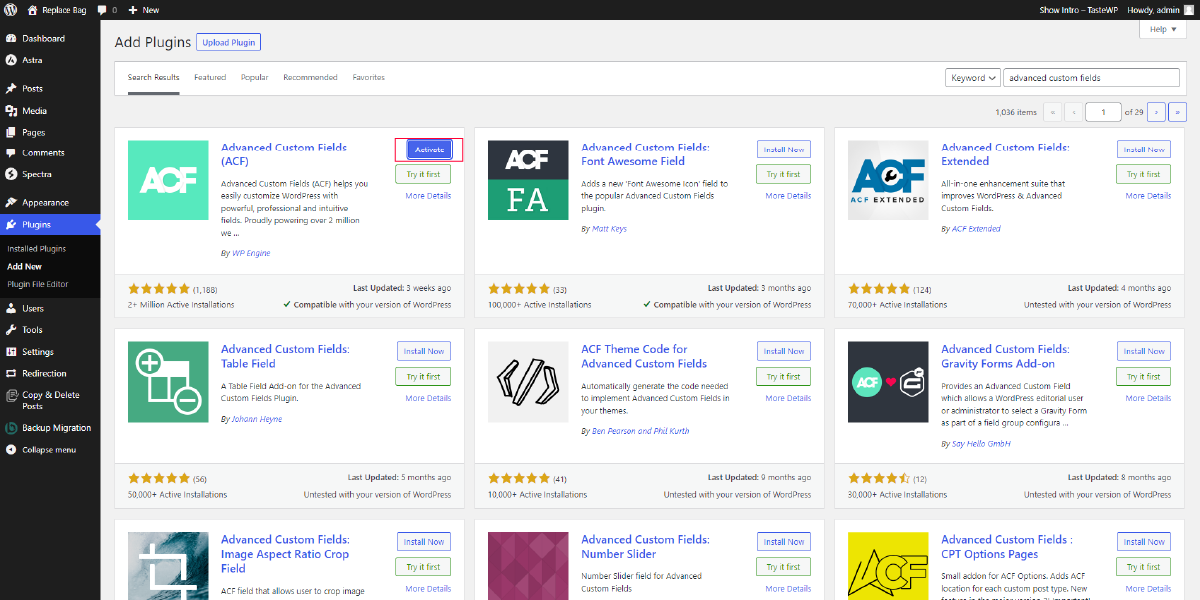
Now that the ACF plugin is active, you can proceed to set up custom fields for WooCommerce.
Once you have installed and activated the Advanced Custom Fields (ACF) plugin for WordPress, the next step in creating WooCommerce custom fields is to create a custom field group. To begin, navigate to your WordPress admin area and locate the new menu item labeled “ACF” in the sidebar. Click on it, and a drop-down menu will appear. Select “Field Group” from the options.
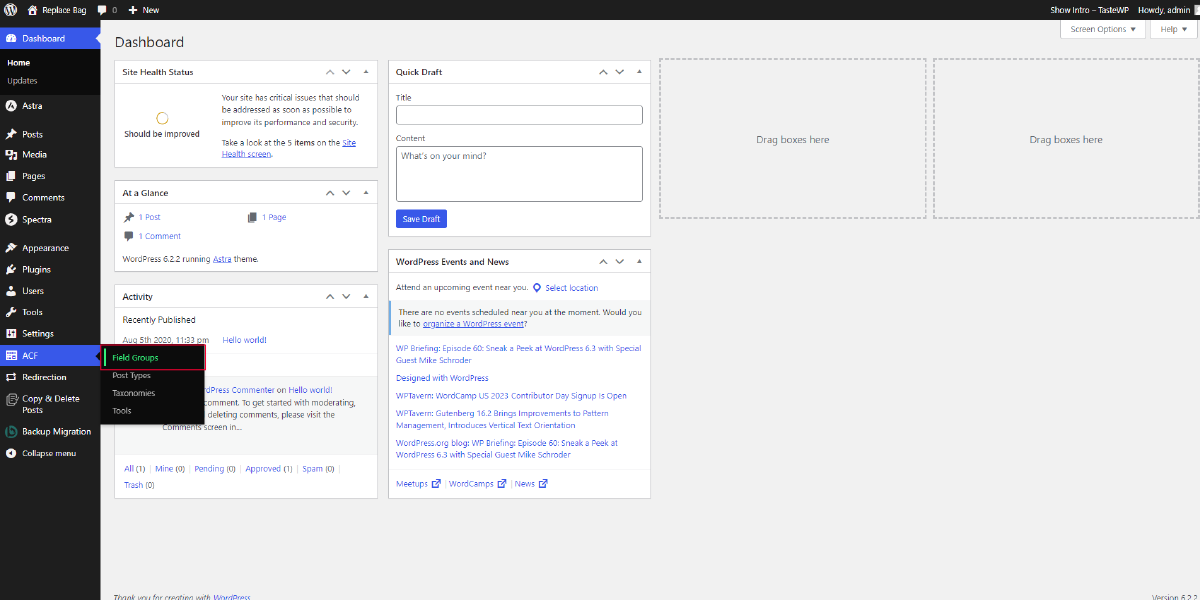
After selecting “Field Group,” you will be taken to a new page where you can create a new custom field group. Click on the “Add New” button to get started. On this page, you will see various settings and options to configure your custom field group.
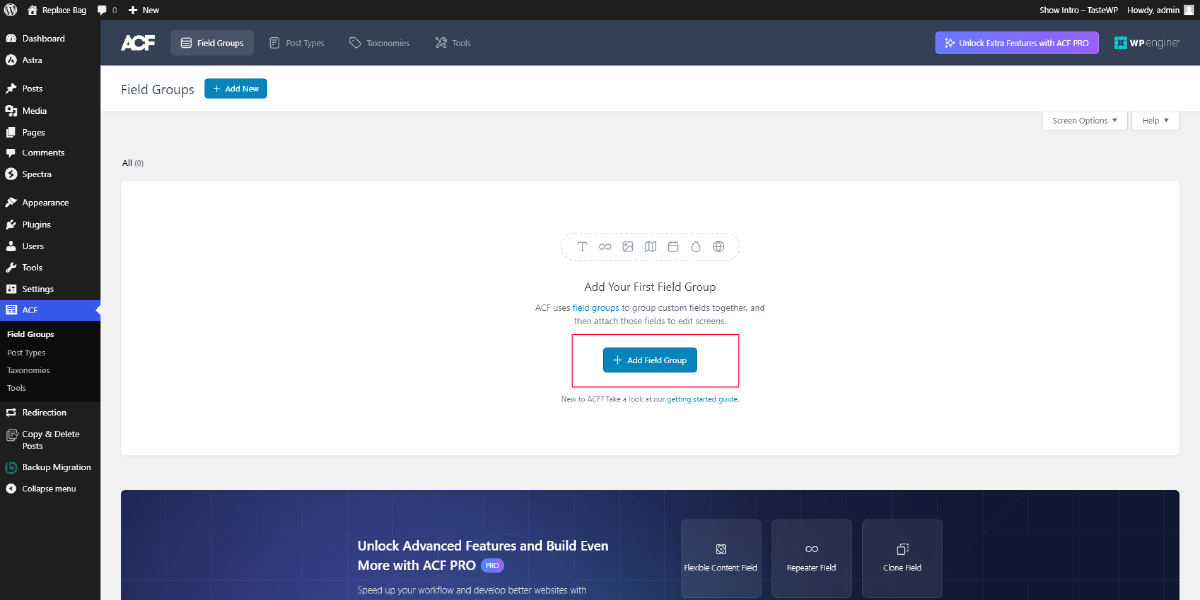
The first step in creating the field group is to give it a descriptive title. For example, you can name it “Product Custom Fields” to indicate that this field group will be used for creating custom fields specific to products in your WooCommerce store.
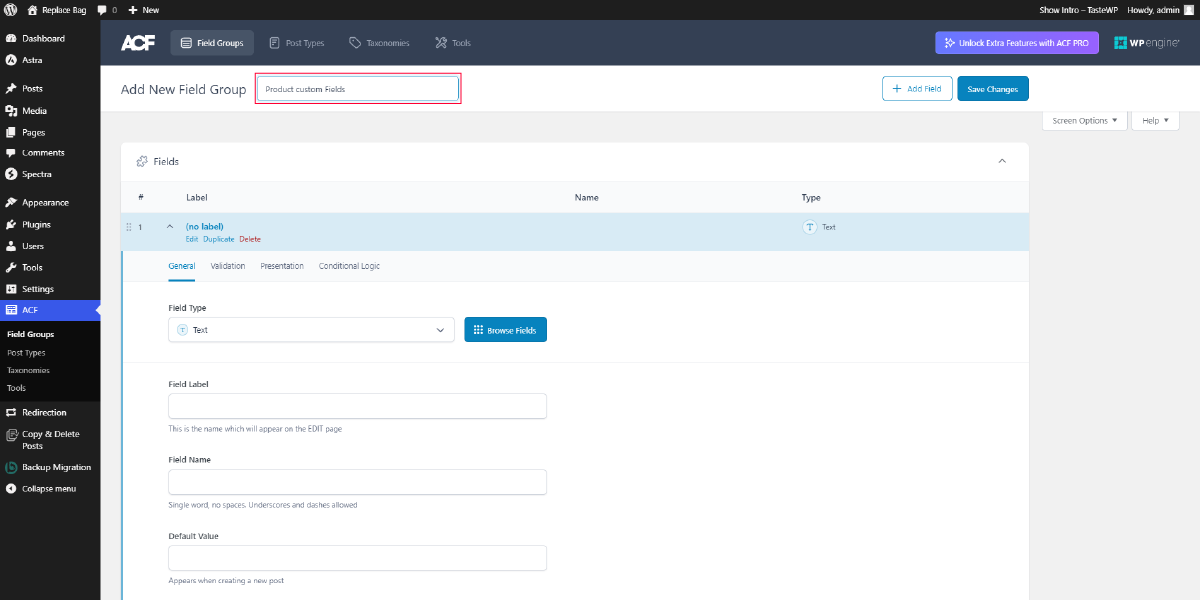
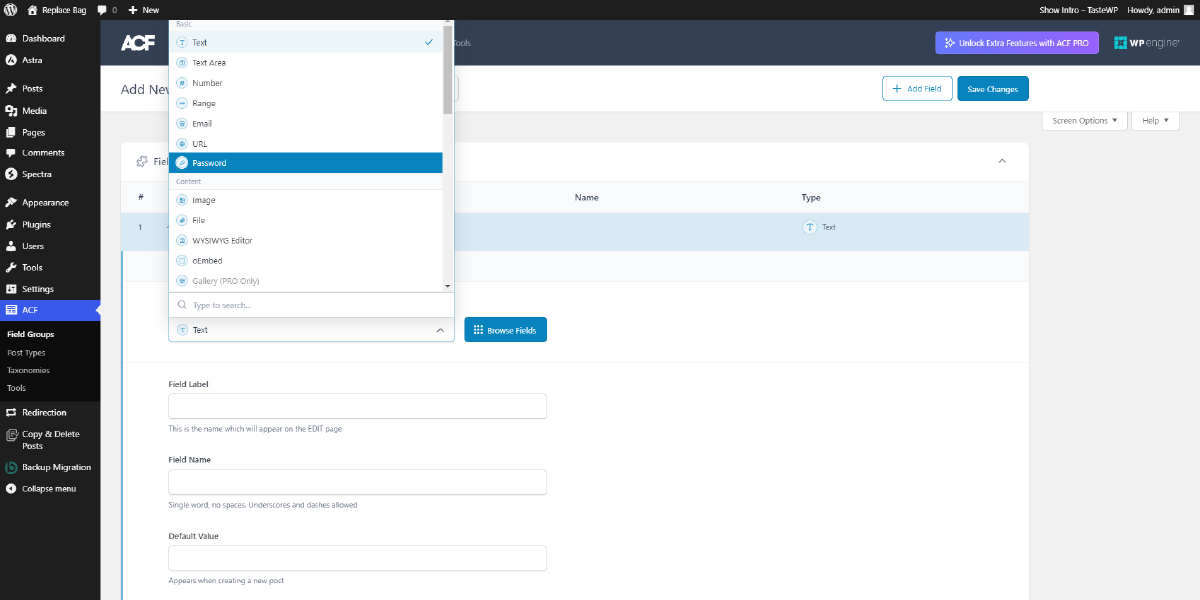
Within the custom field group, you can add multiple custom fields to meet your specific requirements. By clicking “Add Field” you can create your first custom field. A wide range of field types will be available for you to choose from, categorized into different sections.
Under the “Basic” section, you will find field types such as text, ID text area, number, range, email, URL, and password. The “Content” section offers field types like image, file, WYSIWYG editor, oEmbed, and gallery (PRO version only). The “Choice” section provides select, checkbox, radio button, button group, and true/false field types. The “Relational” section includes link, post object, page link, relationship, taxonomy, and user field types. The “Advance” section offers Google Maps, date pickers, date time pickers, time pickers, and color picker field types. Lastly, the “Layout” section includes the message, accordion, tab, group, clone (PRO version only), flexible content (PRO version only), and repeater (PRO version only) field types.
Choose the field type that best suits the information you want to collect for your WooCommerce Related Products. For each custom field you add, you can configure various settings. These include setting a label (the text that will be displayed for the field), a name (the unique identifier for the field), and other options such as default values, placeholder text, and field instructions. Additionally, you can also configure validation rules, presentation settings, and conditional logic for each field if needed.
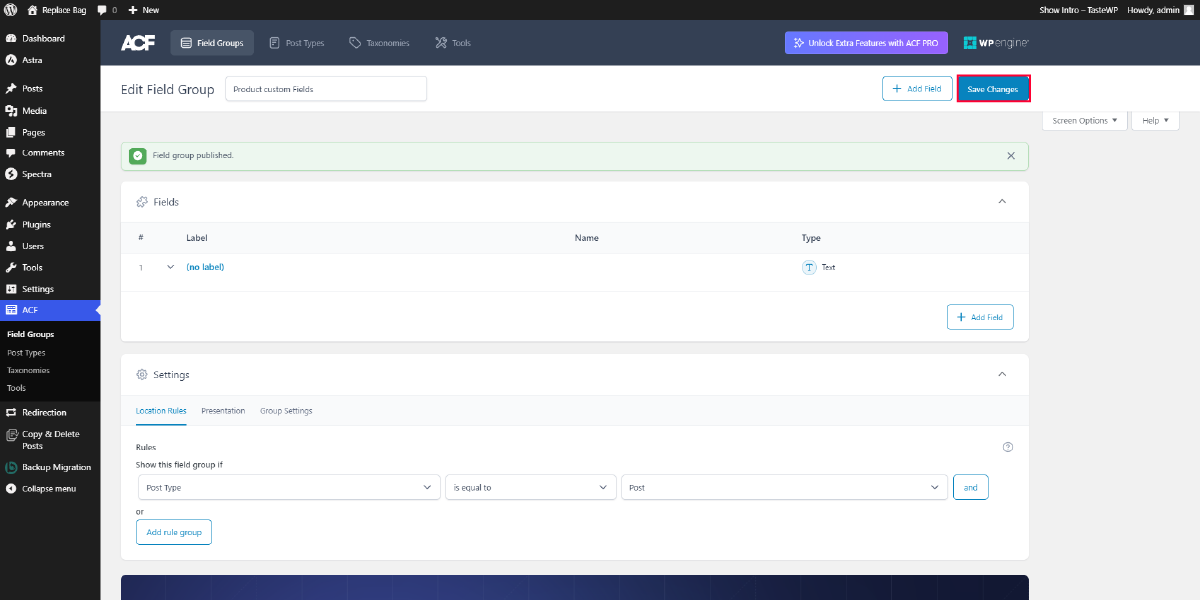
Once you have configured all the necessary settings for your custom field group and its fields, click on the “Save Change” button to save your changes.
To assign the custom field group, you need to access the settings of the field group you created. Within the ACF plugin interface, navigate to the “Field Groups” section, where you will find a list of all the field groups you have created.
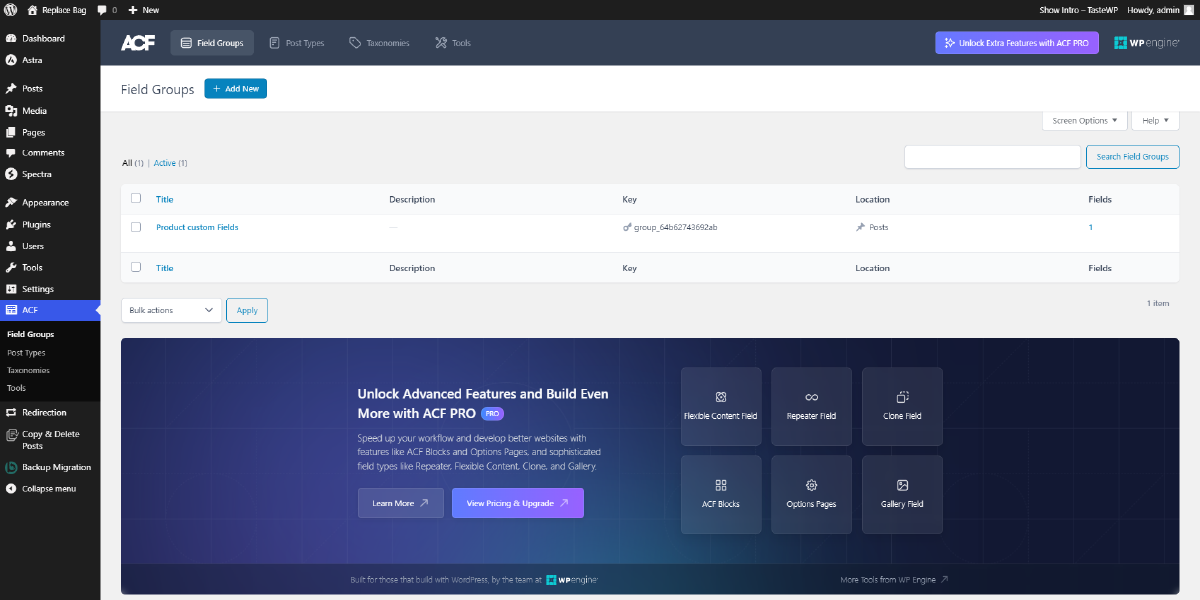
Locate the field group that you want to assign to your WooCommerce products and click on it to access its settings. In the field group settings, you will find various options to configure the behavior and appearance of your custom fields.
One important setting to focus on is the “Location” tab. Click on the “Location” tab to configure the rules that determine where the custom field group will be displayed. ACF provides a flexible and powerful system for defining location rules based on different criteria.
In this case, you want to associate the custom field group with WooCommerce products specifically. Under the “Location” tab, look for the rule selection options. Select the “Post Type” rule, which allows you to define rules based on the type of post or page.
After selecting the “Post Type” rule, a dropdown menu will appear. From this dropdown menu, choose “Product” to specify that the custom field group should be applied to WooCommerce products.
Once you have set the location rule to “Post Type: Product,” save the location rules by clicking on the appropriate button or link provided in the ACF interface. This ensures that the custom field group is now assigned to WooCommerce products.
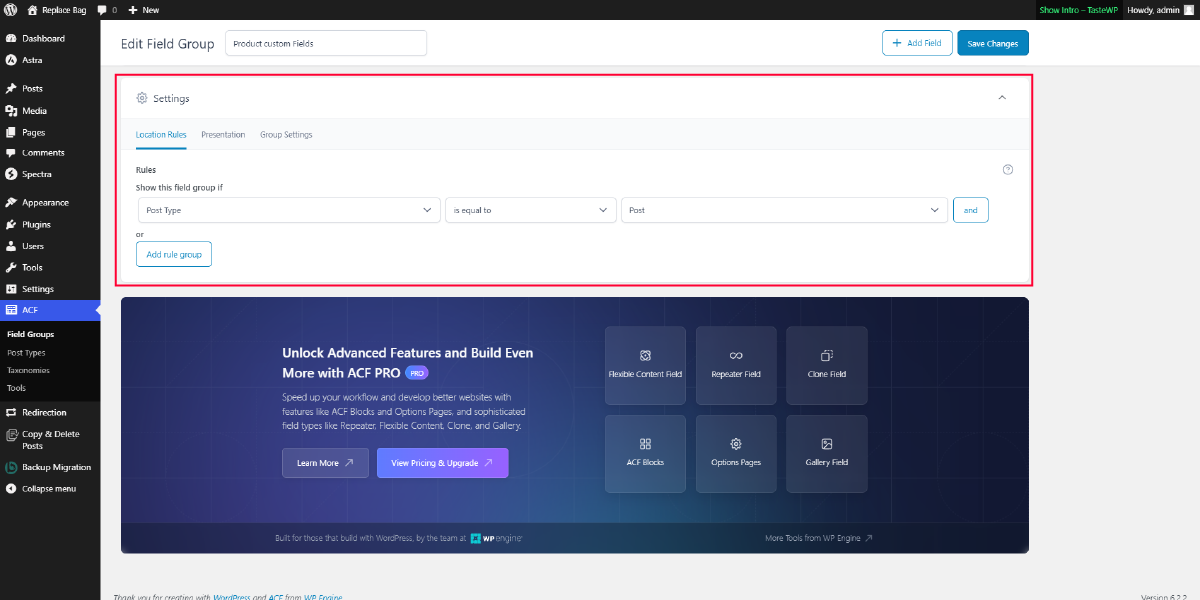
Now, when you edit or create a WooCommerce product, you will see the custom fields you created within the product settings. Enter values for these custom fields, and they will be saved along with the product data.
To create custom fields in WooCommerce, you can utilize the functions.php file in your theme or child theme. The functions.php file allows you to add custom functionality to your WooCommerce store by writing PHP code. By using code snippets, you can extend WooCommerce and add new custom fields to products, orders, or other areas as per your requirements. Here’s a detailed explanation of the process:
Locate the functions.php file:
The functions.php file is a crucial part of your WordPress theme or child theme. It contains PHP code that can be used to add custom functionality to your WooCommerce store. You can find this file by accessing your website’s files through FTP or the file manager provided by your hosting provider. Typically, it is located in the theme directory where your WooCommerce files are stored. If the functions.php file doesn’t exist, you can create a new one.
Using a text editor or an integrated development environment (IDE), open the functions.php file for editing. This file contains PHP code that allows you to add custom functionality to your WooCommerce store. Remember to create a backup of the original functions.php file before making any changes.
Within the functions.php file, you’ll create a new function that adds the custom field to your desired WooCommerce object. Let’s take an example where we add a text input field to the product editing page. Here’s the code:
function add_custom_field() {
echo ‘<div class=”options_group”>’;
woocommerce_wp_text_input(
array(
‘id’ => ‘custom_field’,
‘label’ => __( ‘Custom Field’, ‘your-theme’ ),
‘placeholder’ => __( ‘Enter custom field value’, ‘your-theme’ ),
‘desc_tip’ => ‘true’,
‘description’ => __( ‘This is a custom field description.’, ‘your-theme’ ),
)
);
echo ‘</div>’;
}
In this code snippet, we define the function add_custom_field(). Inside this function, we use the woocommerce_wp_text_input() function to generate a text input field. You can modify the code to suit your requirements, such as using different field types (e.g., checkboxes or dropdowns) or adding additional settings.
After defining the custom field function, we need to hook it to a specific WooCommerce action or filter. Hooks allow you to add your custom functionality at specific points in the WooCommerce execution flow. In our case, we’ll hook the function to the woocommerce_product_options_general_product_data action, which adds the custom field to the product editing page. Here’s the code to hook the function:
add_action( ‘woocommerce_product_options_general_product_data’, ‘add_custom_field’ );
The add_action() function registers our custom field function (add_custom_field()) with the woocommerce_product_options_general_product_data action. This ensures that our function is executed when the product options are being displayed on the product editing page.
After making changes to the functions.php file, you need to save it as plain text without any formatting. It’s important to double-check your code for any errors or syntax issues. Once saved, you can upload the modified functions.php file back to your server, replacing the existing one if necessary. This step ensures that your changes take effect and the custom field functionality is added to your WooCommerce store.
With the custom field code added and the functions.php file uploaded, you can now view and use the custom field in WooCommerce. When you edit a product, the custom field should be displayed in the product options section, allowing you to input the desired information. You can then utilize the value of the custom field in various ways, such as displaying it on the front-end of your website or using it for custom calculations or business logic.
In conclusion, WooCommerce custom fields offer a powerful way to enhance your product pages and tailor them to your specific needs. Throughout this blog, we explored the concept of WooCommerce custom fields, their importance in e-commerce WordPress sites, and two methods to create them.
Using a plugin like Advanced Custom Fields simplifies the process by providing a user-friendly interface to add and manage custom fields. It offers flexibility and extensive customization options, seamlessly integrating with WordPress Elementor themes.
Alternatively, you can leverage the functions.php file in your theme or child theme to create custom fields through code snippets. This method gives you full control over the field structure and behavior, allowing for more advanced customizations.
Whether you choose the plugin or code snippet approach, WooCommerce custom fields enable you to collect and display additional product information, such as specifications, dimensions, or unique attributes. By harnessing the power of custom fields, you can create a more personalized and engaging shopping experience for your customers, leading to increased sales and customer satisfaction.
