WooCommerce is a popular plugin for WordPress websites that allows you to sell products or services online. One of the key pages in any WooCommerce store is the checkout page. This is where customers complete their purchases and provide their payment and shipping information.
By default, the WooCommerce checkout page is functional but not particularly visually appealing. However, with the help of a WordPress page builder like Elementor, you can easily customize your checkout page to make it more visually appealing and user-friendly.
In this blog post, we will take a deep dive into using Elementor to customize your WooCommerce checkout page. We will explore the different design elements you can add to the checkout page, such as product images, payment icons, and custom forms. We will also discuss the importance of creating a smooth and intuitive checkout process for your customers, and how Elementor can help you achieve this.
But why is it important to customize your WooCommerce checkout page in the first place? Well, a well-designed checkout page can improve your conversion rates and increase sales. Customers are more likely to complete their purchase if the checkout process is easy to navigate and visually appealing. A poorly designed checkout page, on the other hand, can lead to cart abandonment and lost sales.
So, whether you’re a small business owner or a web developer, learning how to customize your WooCommerce checkout page with Elementor is valuable. With this knowledge, you can create a checkout page that looks great and improves the overall user experience for your customers.
What Is WooCommerce Checkout Page?
The WooCommerce Checkout Page is a crucial part of any online store built on the WooCommerce plugin for WordPress. It is the page where customers complete their purchases by entering their billing and shipping information, choosing a payment method, and confirming their order. The checkout page is the final step in the buying process, and it can have a significant impact on your conversion rates and overall sales.
By default, the WooCommerce checkout page includes basic fields for customers to enter their billing and shipping information, as well as a list of the items in their cart and the total cost. Customers can choose from available payment methods, such as credit card or PayPal, and provide their payment information.
However, as we know the default WooCommerce checkout page is often not visually appealing and may not offer the best user experience. That’s where customization comes in. With a page builder like Elementor and Elementor WooCommerce builder you can customize the checkout page to match your brand’s style and create a seamless user experience that encourages customers to complete their purchases.
Benefits Of Customizing The WooCommerce Checkout Page With Elementor
Customizing the checkout page with Elementor can offer several benefits. Here are some of the benefits in detail:
- Improved Design and Branding: The default checkout page of WooCommerce may not match the design and branding of your website, which can create a disjointed user experience. By using Elementor to customize your checkout page, you can match the design and branding of your website and create a consistent user experience throughout the entire checkout process. This can improve trust and credibility with your customers, leading to higher conversion rates.
- Enhanced User Experience: The default WooCommerce checkout page may not be optimized for user experience, which can lead to cart abandonment and lost sales. With Elementor, you can customize the checkout page to make it more user-friendly and intuitive, with clear calls to action and easy-to-follow steps. This can reduce friction and improve the overall shopping experience, leading to higher customer satisfaction and loyalty.
- Greater Flexibility and Control: The default WooCommerce checkout page may not offer the flexibility and control that you need to customize the checkout process for your specific business needs. With Elementor, you have complete control over the design and functionality of the checkout page, allowing you to create a customized checkout process that meets the specific needs of your business and customers.
- Integration with Third-Party Plugins: WooCommerce is a highly extensible platform, with a wide range of third-party plugins available to enhance its functionality. By customizing your checkout page with Elementor, you can integrate these plugins into the checkout process and create a more seamless and efficient checkout experience for your customers.
- Improved Conversion Rates: Ultimately, the goal of customizing your checkout page with Elementor is to improve conversion rates and increase sales. By creating a more user-friendly, visually appealing, and streamlined checkout process, you can reduce cart abandonment and increase the likelihood that customers will complete their purchases.
Overall, customizing the WooCommerce checkout page with Elementor and E-commerce Website WordPress Themes can offer a range of benefits for businesses looking to improve their e-commerce website. From improved design and branding to enhanced user experience, greater flexibility and control, integration with third-party plugins, and higher conversion rates, there are many compelling reasons to consider customizing your checkout page with Elementor.
How To Customize The WooCommerce Checkout Page With Elementor?
Customizing the WooCommerce Checkout Page with Elementor is a straightforward process, which involves the following steps.
Step 1: Install And Activate Elementor And WooCommerce
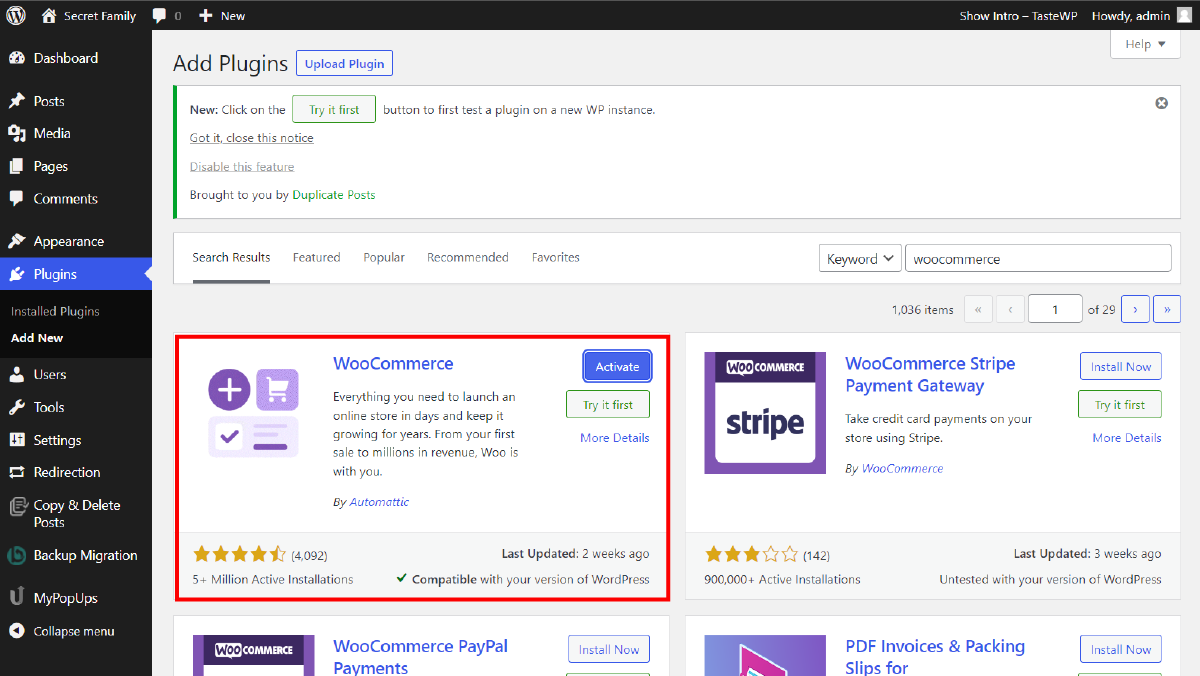
The first step in customizing the WooCommerce Checkout Page with Elementor is to install and activate both Elementor and WooCommerce on your WordPress website. Elementor is a popular page builder that allows users to create custom pages on their WordPress site, while WooCommerce is a powerful e-commerce platform that enables users to sell products and services online.
To install and activate Elementor and WooCommerce, you can go to the Plugins section of your WordPress dashboard and search for both plugins. Once you have located them, you can click on the “Install Now” button to download them onto your website. After installation, you will need to activate both plugins by clicking on the “Activate” button.
It is important to note that Elementor and WooCommerce are both free plugins, but they also offer premium versions with additional features and functionality. However, the free versions are usually sufficient for most users.
After installing and activating both plugins, you will have access to a wide range of customization options for your WooCommerce checkout page. Elementor provides a drag-and-drop interface that makes it easy to add and edit page elements, while WooCommerce provides a robust set of tools for managing orders, payments, and shipping.
Overall, installing and activating Elementor and WooCommerce is the first step in customizing the WooCommerce checkout page. By doing so, you will have access to powerful tools for creating a custom checkout page that meets your specific needs and requirements.
Step 2: Create A New Checkout Page
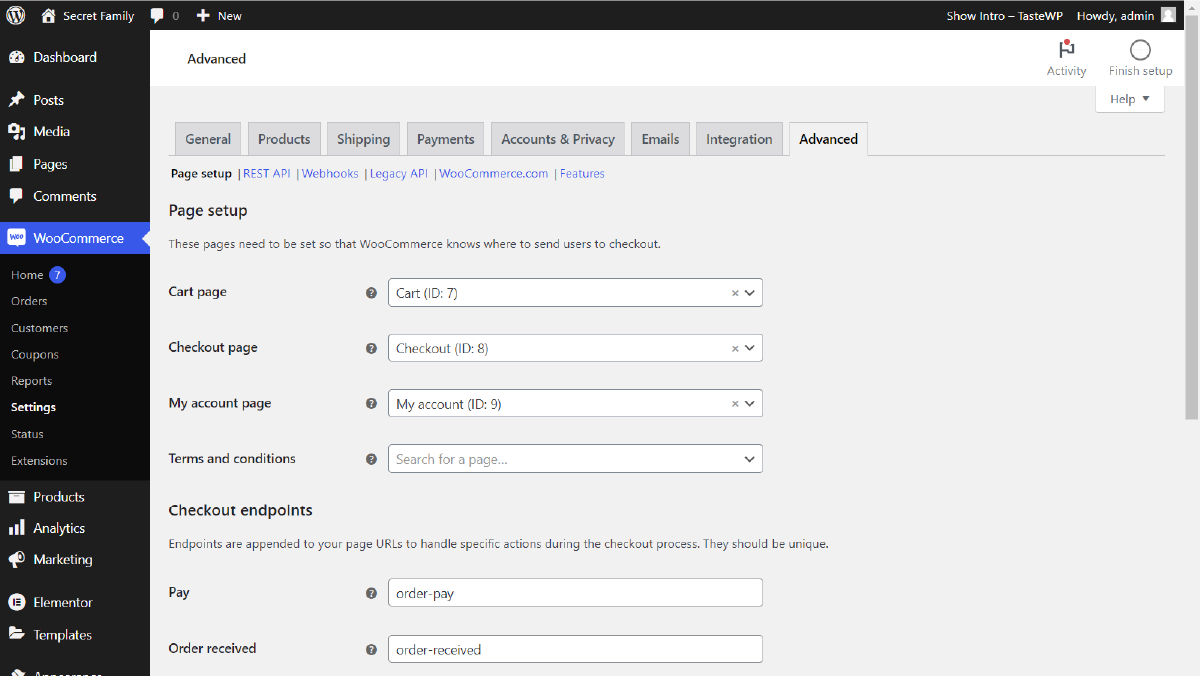
The second step is to create a new checkout page. After you have installed and activated both Elementor and WooCommerce, you will need to navigate to the WooCommerce settings in your WordPress dashboard.
To create a new checkout page, go to WooCommerce > Settings > Advanced > Checkout Pages. Here, you will see a list of pages that WooCommerce uses for the checkout process, including the cart page, checkout page, and order received page.
If you want to use an existing page as your checkout page, you can simply select it from the list. However, if you want to create a new page, click on the “Create new page” button. This will open up a new page in your WordPress dashboard, where you can customize the page with Elementor.
When creating a new checkout page, it is important to consider the layout and design of the page. You may want to include a header section with your logo and branding, a section for the checkout form, and a footer section with additional information or links.
Step 3: Edit The Checkout Page With Elementor
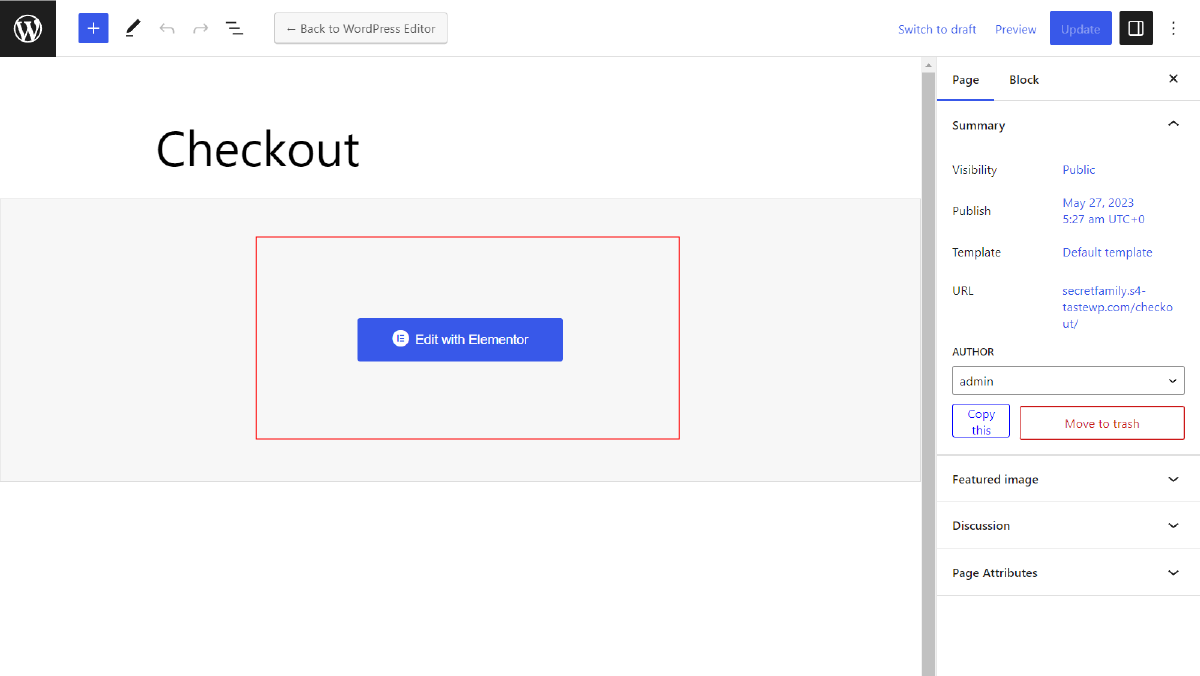
The third step in customizing the WooCommerce Checkout Page with Elementor is to edit the checkout page with Elementor. Once you have created a new checkout page in WooCommerce, you can use Elementor’s drag-and-drop interface to customize the page to your liking.
To edit the checkout page with Elementor, go to Pages > All Pages in your WordPress dashboard and find the page you created for the checkout. Hover over the page and click on the “Edit with Elementor” button to open up the Elementor editor.
From here, you can start adding new elements to the checkout page or editing the existing ones. You can choose from a wide range of pre-designed templates or start from scratch by adding widgets, text, images, and other elements to the page.
When designing the checkout page, it is important to keep in mind the user experience and make the page as easy to navigate as possible. You may want to include a progress bar to show users where they are in the checkout process or add a section for promotional messages or discount codes.
Additionally, it is important to ensure that the checkout page is optimized for mobile devices, as more and more customers are using their phones to make purchases online.
Step 4: Customize The Checkout Form
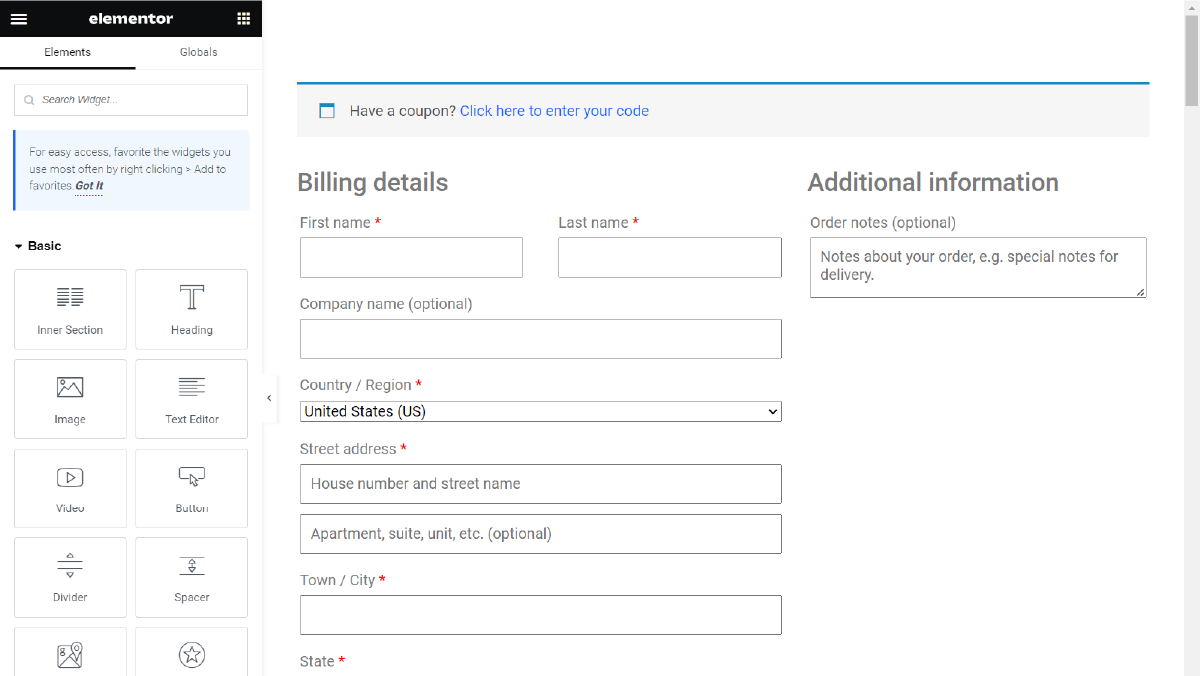
The fourth step in customizing the WooCommerce Checkout Page with Elementor is to customize the checkout form. The checkout form is the most important part of the checkout page, as it collects the information needed to complete the purchase.
To customize the checkout form, you can use Elementor’s form widget, which allows you to create custom forms with a wide range of field types, including text fields, dropdown menus, checkboxes, and radio buttons.
To add a form to the checkout page, simply drag the form widget onto the page in the Elementor editor. From here, you can add new fields to the form or edit the existing ones.
When customizing the checkout form, it is important to only ask for the information that is necessary to complete the purchase. Asking for too much information can be overwhelming for users and may lead to cart abandonment.
Some important fields to include on the checkout form include the user’s name, billing, and shipping address, email address, and payment information. You may also want to include optional fields for additional information, such as a phone number or company name.
To customize the look and feel of the form, you can use Elementor’s styling options. This includes options for customizing the font, color, and size of the form fields, as well as the layout of the form itself.
In addition to the standard fields, you can also add custom fields to the checkout form using plugins such as Advanced Custom Fields or Custom Field Suite. This allows you to collect additional information from users, such as their preferred shipping method or a custom message to include with the order.
When designing the checkout form, it is important to test the form thoroughly to ensure that it is working correctly. This includes testing the form on both desktop and mobile devices and making sure that all required fields are filled out correctly before allowing users to submit the form.
Step 5: Publish The Checkout Page
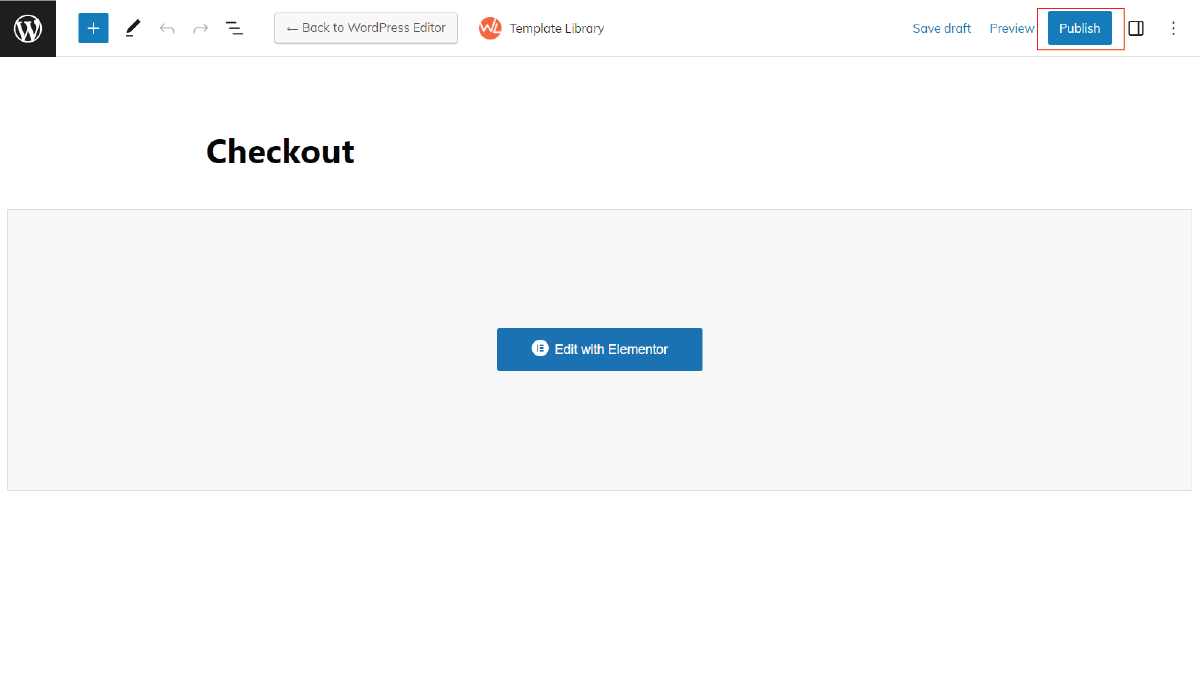
The final step in customizing the WooCommerce Checkout Page with Elementor is to test and publish the checkout page. Before making the page live, it is important to thoroughly test the page to ensure that it is working correctly and providing a positive user experience.
To test the checkout page, start by adding a product to the cart and proceeding to the checkout page. Make sure that all of the fields on the checkout form are working correctly and that users can complete the purchase without encountering any errors.
Next, test the checkout page on different devices, including desktops, tablets, and mobile phones. Make sure that the page is optimized for each device and that the checkout process is easy to complete on all devices.
Once you have tested the checkout page and made any necessary adjustments, you can publish the page on your website. To do this, go to the page editor in WordPress and click on the “Publish” button to make the page live.
After publishing the checkout page, it is important to continue monitoring the page and making adjustments as necessary. This includes tracking conversion rates and user behavior on the page, and making adjustments to the design and functionality of the page based on this data.
In addition to monitoring the checkout page, it is also important to keep WooCommerce and Elementor up-to-date with the latest versions. This ensures that the checkout page is always working correctly and providing a positive user experience.
Conclusion
In conclusion, incorporating WordPress Elementor themes, while customizing WooCommerce checkout page with Elementor is a great way to enhance the user experience, improve brand consistency, and ultimately increase sales. With Elementor’s drag-and-drop interface, customizing the checkout page is easy and requires no coding knowledge. By following the 5 simple steps outlined in this article, you can create a customized checkout page that meets the specific needs of your business and customers. Explore our WordPress Theme Bundle for more options.
Customizing your checkout page with Elementor can help you stand out in a crowded e-commerce market, and provide a seamless shopping experience that will keep customers coming back. So, whether you’re looking to improve the design and branding of your checkout page, or simply want to increase conversion rates, customizing your WooCommerce checkout page with Elementor is a great option to consider.


