In today’s competitive market, it is no longer enough to have a functional e-commerce website. To truly stand out and engage your customers, you need to create an immersive and visually appealing shopping experience. That’s where Elementor, a popular drag-and-drop WordPress page builder, comes into play.
With Elementor, you have the power to customize every aspect of your website, including the WooCommerce Cart Widget. This essential feature allows your customers to view and manage their shopping carts, making it a critical component for driving conversions.
By customizing the design of your WooCommerce Cart Widget, you can create a seamless and intuitive checkout process that enhances user experience and boosts your sales. Imagine having full control over the layout, colors, typography, and even animations of your cart widget, enabling you to align it perfectly with your brand’s aesthetics and messaging.
In this blog, we will guide you through the step-by-step process of customizing your Elementor WooCommerce Cart Widget. We will explore various techniques, tips, and tricks to help you optimize the widget’s design and functionality. From choosing the right color scheme to implementing persuasive call-to-action buttons, we will equip you with the knowledge and tools to create a compelling shopping cart experience that drives conversions.
So, if you are ready to take your e-commerce game to the next level, let’s dive in and discover how you can customize the design of your Elementor WooCommerce Cart Widget to boost your online sales!
Elementor WooCommerce Cart Widget
The Elementor WooCommerce Cart Widget is a powerful tool that allows you to customize the appearance and functionality of the shopping cart on your WooCommerce-powered e-commerce website. It is a specific widget offered by Elementor, a popular drag-and-drop page builder for WordPress.
What sets the Elementor WooCommerce Cart Widget apart from other cart widgets is its seamless integration with Elementor’s intuitive interface and extensive customization options. Unlike standard WooCommerce cart widgets, which often have limited design flexibility, the Elementor WooCommerce Cart Widget gives you complete control over the visual elements of your shopping cart.
With the Elementor WooCommerce Cart Widget, you can customize various aspects of the cart’s design to align with your brand’s aesthetics and create a cohesive user experience. You can modify the layout, choose colors that match your brand palette, select the typography that best represents your brand voice, and even add animations to enhance user engagement.
Furthermore, the Elementor WooCommerce Cart Widget allows you to go beyond just design customization. You can also add additional functionality and features to the cart, such as displaying related products, offering upsells or cross-sells, or incorporating dynamic pricing based on cart contents.
By leveraging the power of Elementor and its dedicated WooCommerce Cart Widget, you can create a visually stunning and user-friendly shopping cart that stands out from the competition. This level of customization not only enhances the overall user experience but also increases the likelihood of conversions and boosts your e-commerce sales.
How To Use And Customize An Elementor WooCommerce Cart Widget?
Here are the steps you need to follow in order to use the Elementor WooCommerce Cart Widget and customize it to suit your needs.
Step 1: Install And Activate The Plugins
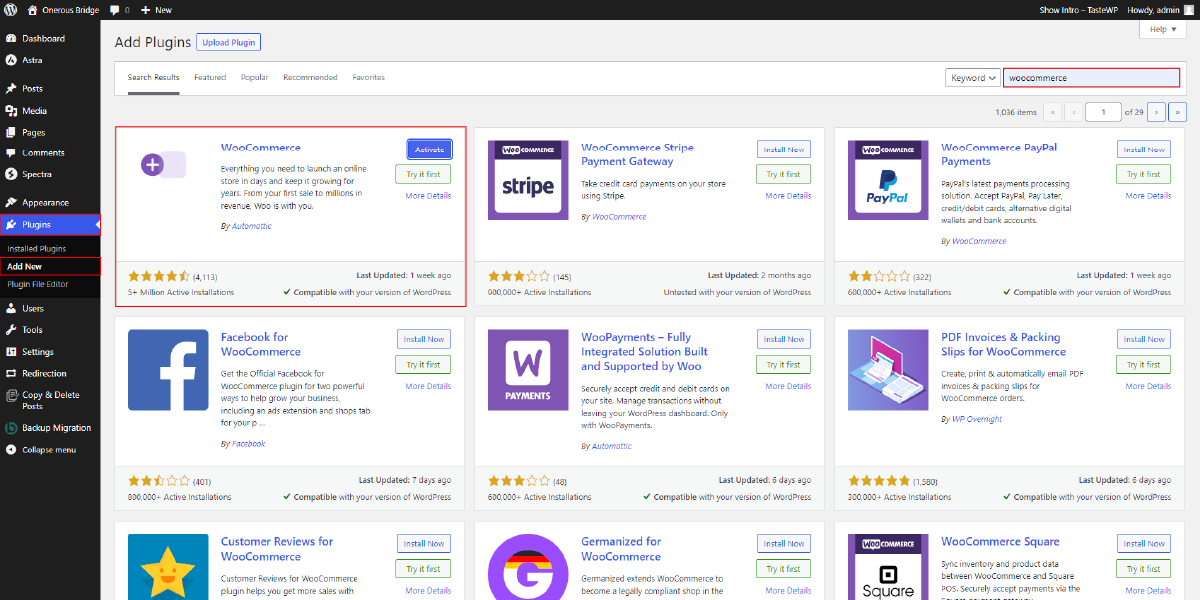
To begin using and customizing the Elementor WooCommerce Cart Widget, there are a few essential steps you need to take. The first step is to install and activate the required plugins, specifically WooCommerce and Elementor.
Installing WooCommerce is crucial as it is a powerful e-commerce plugin for WordPress that adds essential shopping cart functionality to your website. To install WooCommerce, navigate to the WordPress dashboard, click on “Plugins” in the left-hand menu, and then select “Add New.” In the search bar, type “WooCommerce” and click on the “Install Now” button next to the official WooCommerce plugin. Once the plugin has been installed, click “Activate” to enable it.
Once WooCommerce is installed and activated, you can move on to installing and activating the Elementor plugin. Elementor is a popular drag-and-drop page builder that allows you to visually design and customize your website’s pages, including the WooCommerce cart widget. To install Elementor, follow the same process as with WooCommerce: navigate to the WordPress dashboard, select “Plugins” and then “Add New.” Search for “Elementor” in the plugin repository and click on “Install Now.” Once the installation is complete, click on “Activate” to enable Elementor on your website.
By installing and activating both WooCommerce and Elementor, you have set the foundation for using the Elementor WooCommerce Cart Widget. WooCommerce provides e-commerce functionality, while Elementor gives you the tools to visually customize and design the cart widget to match your website’s branding and improve the user experience. These plugins work together seamlessly, empowering you to create a compelling and user-friendly shopping cart experience on your website.
Step 2: Create Or Edit A Page with Elementor
Once you have successfully installed and activated both the WooCommerce and Elementor plugins on your WordPress website, you can proceed to create or edit a page where you want to add or customize the Elementor WooCommerce Cart Widget.
To begin, navigate to the WordPress dashboard and locate the “Pages” section. Here, you can either create a new page specifically for the cart widget or choose to edit an existing page that already includes WooCommerce elements. Select the desired page and click on the “Edit” option.
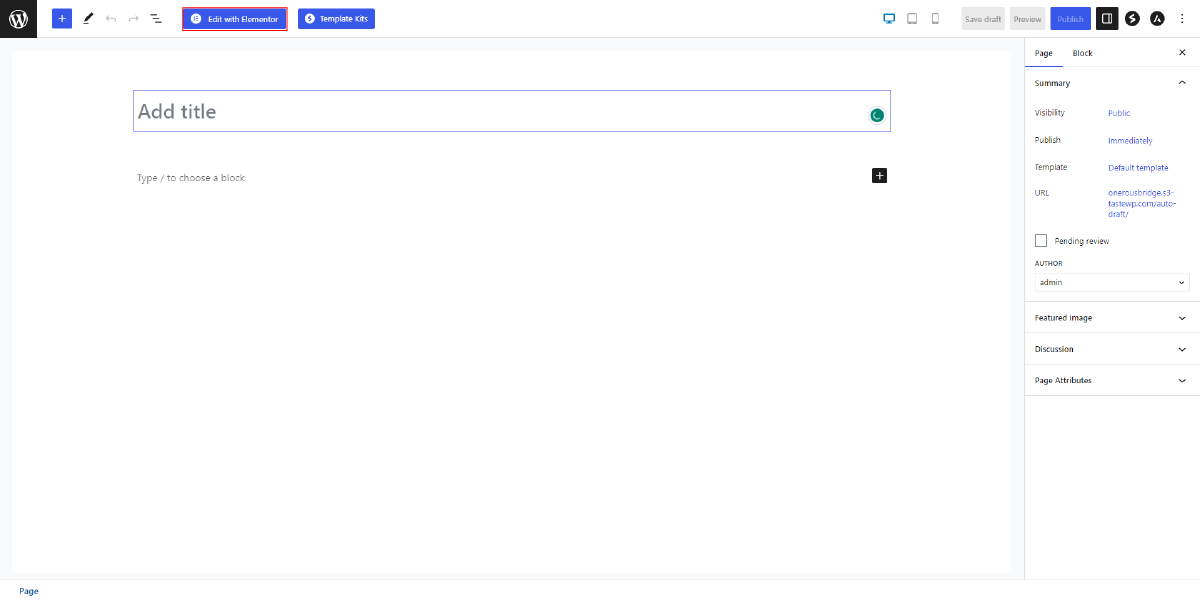
Upon clicking “Edit,” the page will open in the default WordPress Content editor. To access the full capabilities of Elementor and customize the page using its intuitive drag-and-drop interface, you need to click on the “Edit with Elementor” button.
As you click on the “Edit with Elementor” button, the page will transition into the Elementor editor mode. Now, you have entered the Elementor page builder, which provides a user-friendly and flexible environment for customizing your website’s design. You can visually edit and rearrange the page elements, add new sections and widgets, and modify the content and layout as needed.
Step 3: Add The Elementor WooCommerce Cart Widget
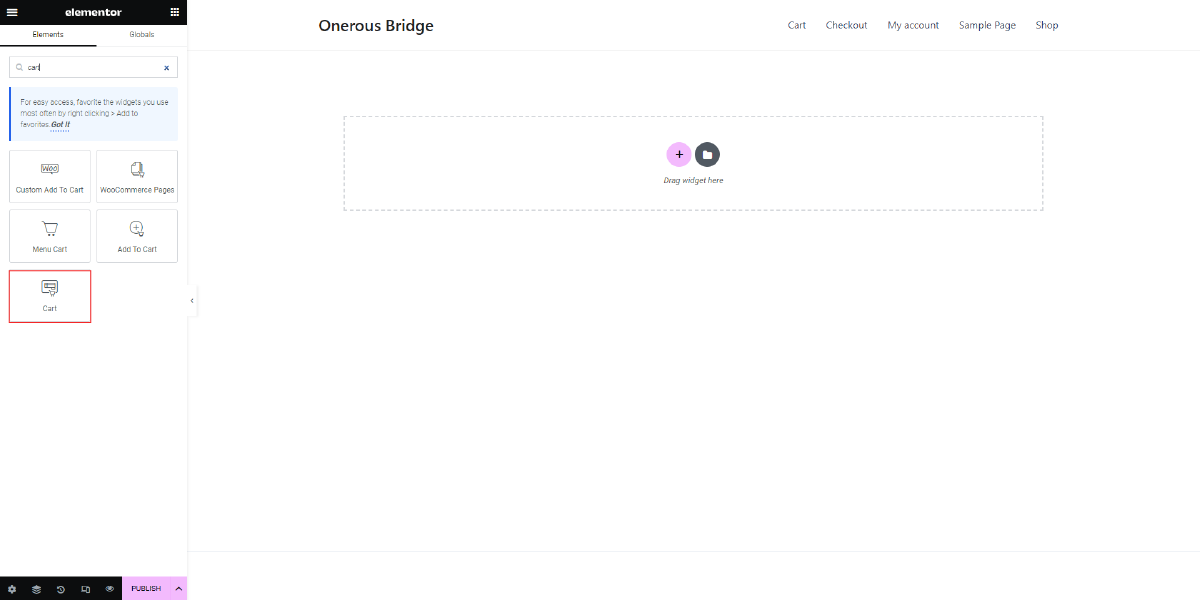
After creating a page using Elementor, you can proceed to add the Elementor WooCommerce Cart Widget to your page.
To locate the widget, you can search for the “WooCommerce Cart” widget in the Elementor panel. The panel is usually located on the left-hand side of the Elementor interface A variety of widgets are available for adding to your page. Once you find the “WooCommerce Cart” widget in the panel, you can simply click on it to select it.
Alternatively, you can also add the widget by dragging and dropping it onto the desired section of your page. To do this, click on the “WooCommerce Cart” widget in the Elementor panel, and while holding the mouse button, drag it to the section where you want it to appear on your page. Drop the widget into place by releasing the mouse button. Once you have added the Elementor WooCommerce Cart Widget to your page, you can proceed further.
Step 4: Customize The Layout And Design
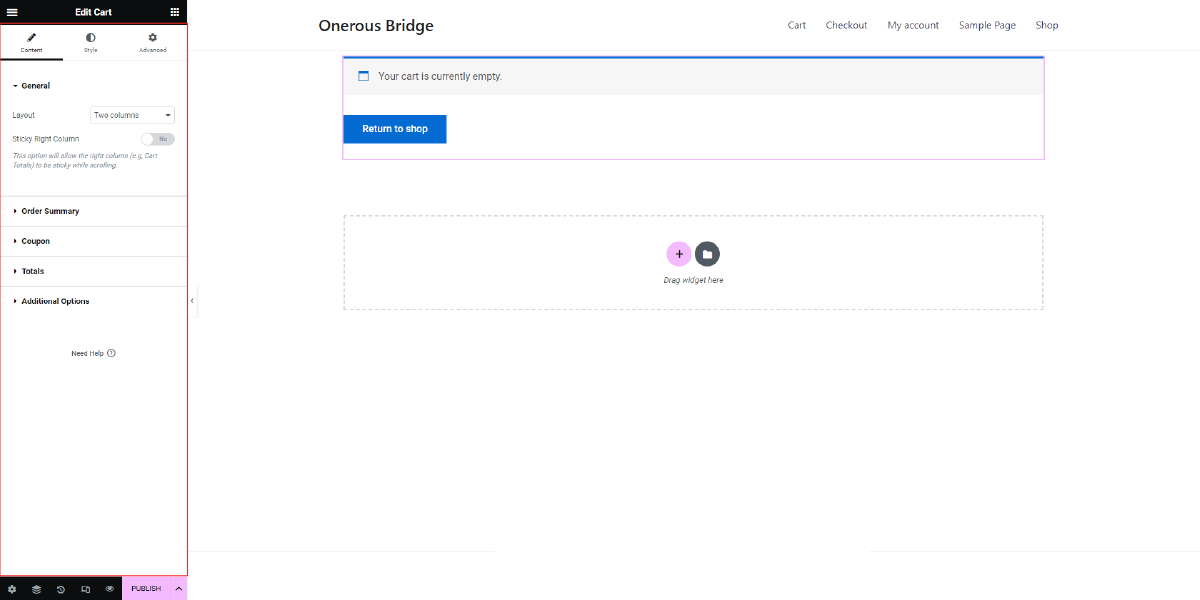
After adding the Elementor WooCommerce Cart Widget to your website, you can begin customizing its layout and design to suit your preferences. Here, you’ll find a range of settings and options specifically designed for customizing the cart widget.
Locate the cart widget within the Elementor panel and click on it to access its settings. By clicking on the cart widget, you will be directed to a dedicated editing interface where you can make various customizations.
Once you’re in the cart widget settings, you’ll notice several tabs available for customization, such as “Content,” “Style,” and “Advanced.” These tabs provide you with different options and controls to modify the appearance and behavior of the widget.
The “Content” tab allows you to configure the content displayed within the cart widget. Here, you can choose what information is shown to the user, such as the product name, image, quantity, price, and total. You may also have options to display additional details, like product variations or attributes, if applicable.
Moving on to the “Style” tab, you’ll have access to a wide range of styling options to personalize the appearance of the cart widget. You can modify the typography, colors, borders, backgrounds, and spacing to match your website’s overall design. These options often include settings for font size, font family, text color, background color, border radius, and more. By adjusting these settings, you can create a visually appealing and cohesive cart widget that seamlessly integrates with the rest of your website’s design.
In the “Advanced” tab, you’ll find more advanced customization options for the cart widget. Here, you can fine-tune the widget’s responsiveness, visibility, and positioning. Advanced settings might include options to control the widget’s width and height, enable or disable animations, set the widget’s position within the page, and define its behavior on different devices.
By exploring these tabs and experimenting with the available settings and options, you can achieve a highly customized layout and design for your Elementor WooCommerce Cart Widget.
Step 5: Save And Publish
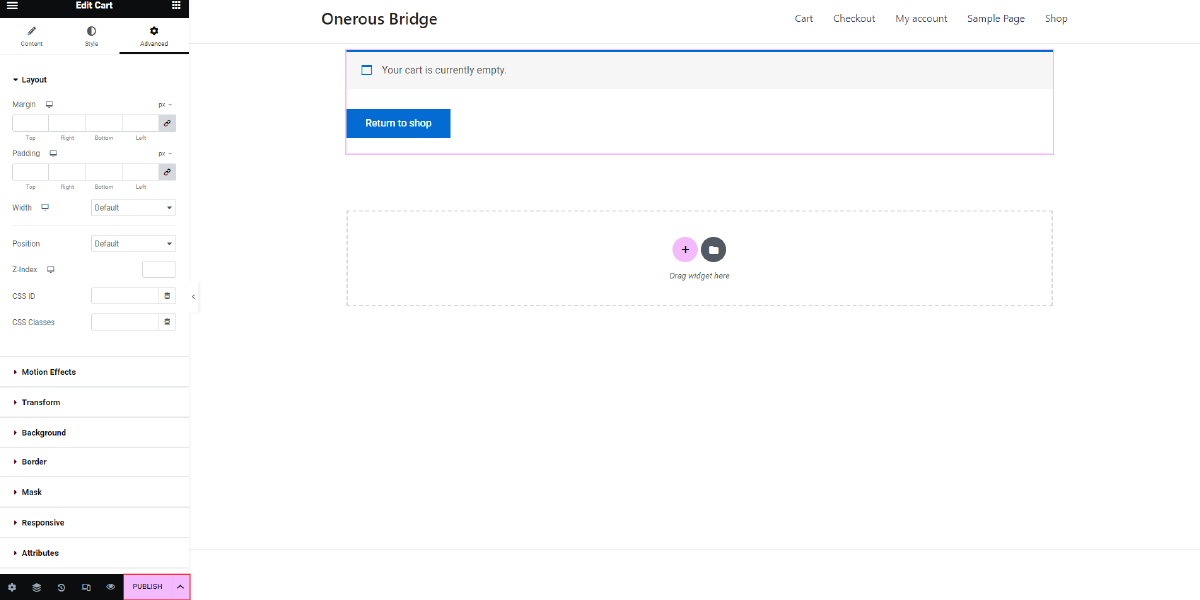
After completing the customization of your Elementor WooCommerce Cart Widget, you can take the first steps to make your changes live on your website. Once you are satisfied with the layout, design, and content modifications you made to the widget, you need to click the “Update” or “Publish” button to save the changes.
By clicking the “Update” button, you are saving the modifications you made to the widget and updating the existing version on your website. This is useful when you want to make changes to an existing widget and keep it consistent with the rest of your website’s design and functionality.
On the other hand, clicking the “Publish” button allows you to create a new version of the widget and make it live on your website. This is typically used when you are creating a new widget or making significant changes that you want to immediately apply to your website.
By saving and publishing the changes you made to the Elementor WooCommerce Cart Widget, you ensure that your customizations are implemented and visible to your website visitors. This is an essential step to ensure that your website reflects the desired appearance and functionality you envisioned for your WooCommerce cart.
Conclusion
In conclusion, the Elementor WooCommerce Cart Widget, along with compatible WordPress Elementor themes, is a powerful tool that can significantly boost your e-commerce sales. Throughout this blog, we have explored what the widget is, how it stands out from others in the market, and how to effectively use and customize it.
The Elementor WooCommerce Cart Widget offers a seamless integration between Elementor and WooCommerce, providing a visually appealing and user-friendly shopping cart experience for your customers. Its versatility and flexibility allow you to customize the cart widget to match your brand’s aesthetics and optimize the checkout process.
By leveraging the capabilities of the Elementor WooCommerce Cart Widget, you can enhance the overall shopping experience, increase conversion rates, and ultimately drive more sales. The widget’s intuitive interface and extensive features enable you to showcase product details, implement cross-selling strategies, and create urgency through dynamic notifications.
Furthermore, the Elementor WooCommerce Cart Widget empowers you to streamline the purchase journey, reduce cart abandonment, and encourage repeat purchases. With its real-time update feature, customers can easily track their cart contents, apply discounts, and proceed to checkout seamlessly.
In today’s competitive e-commerce landscape, providing a smooth and visually appealing shopping experience is crucial. The Elementor WooCommerce Cart Widget equips you with the necessary tools to create an engaging and user-friendly interface, giving your online store a competitive edge.
So, whether you’re an e-commerce entrepreneur or a website developer, integrating the Elementor WooCommerce Cart Widget into your online store can significantly enhance your sales and customer satisfaction. It’s time to unlock the full potential of your e-commerce business and take it to new heights with the powerful Elementor WooCommerce Cart Widget and when combined with the Premium WordPress themes your website can achieve new heights. Also you can consider using the WordPress theme bundle where you can get 50+ Premium WordPress themes in a single package.


