
Make a splash this summer with 25% off on Bundle of 42+ Elementor WP Themes. Use code “SUNNY25” to unlock the deal.
Sun's out, savings on! Enjoy 25% OFF on all Premium WordPress Themes with code “SUNSHINE25”
Make a splash this summer with 25% off on Bundle of 42+ Elementor WP Themes. Use code “SUNNY25” to unlock the deal.
Sun's out, savings on! Enjoy 25% OFF on all Premium WordPress Themes with code “SUNSHINE25”

Welcome back, WordPress enthusiasts! In our last blog, we explored the top 5 SMTP plugins for WordPress. Now, it’s time to shift gears from planning to execution. We’re diving into the practical side of things – to setup WordPress SMTP on your website.
SMTP (Simple Mail Transfer Protocol) is the unsung hero in ensuring reliable email delivery for your WordPress site. It’s the difference between planning a journey and hitting the road. We’ve already planned our route with the best plugins; now, let’s start the engine and witness the seamless execution of those plans.
In this blog, you will learn how to configure WordPress SMTP settings. From setup to troubleshooting, we’ve got you covered. Say goodbye to email delivery issues and welcome a smoother, more reliable communication experience. Let’s make your website’s communication as dynamic as its content!

Before embarking on the process to setup WordPress SMTP for your website, it’s essential to ensure you have all the necessary prerequisites to guarantee a seamless and successful configuration. Below is a comprehensive explanation of these prerequisites:
By ensuring you have these prerequisites fulfilled, you’ll be adequately equipped to setup WordPress SMTP on your website seamlessly and efficiently, mitigating the risk of any disruptions to your email communication channels.
The Process to Setup WordPress SMTP on your website with the WP Mail SMTP by WPForms plugin is straightforward and involves a series of well-defined steps. Let’s take a closer look at each step:
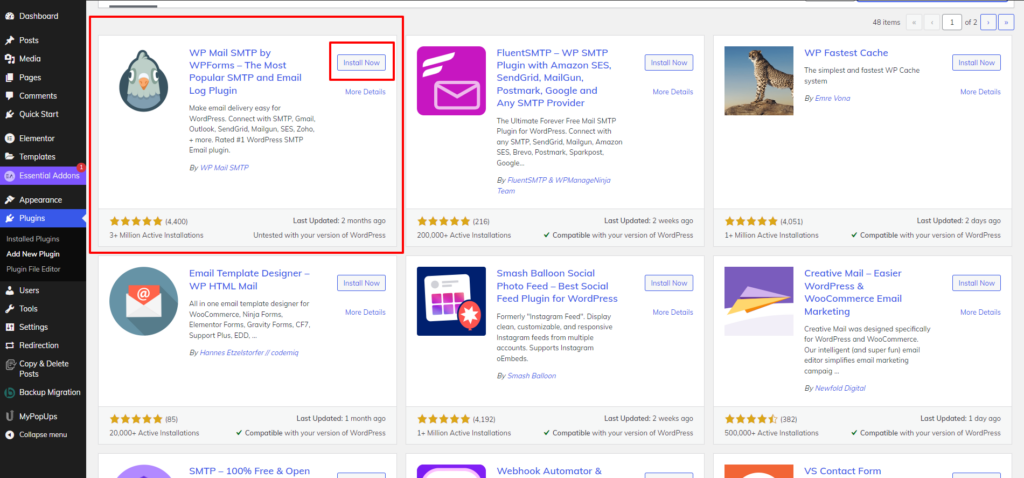
To initiate the process to setup WordPress SMTP on your website using the WP Mail SMTP by WPForms plugin, begin by accessing your WordPress dashboard. Once logged in, direct your attention to the sidebar, where you’ll find a menu option labeled “Plugins.” Click on this option, which will expand to reveal additional choices. From there, select “Add New.” This action will take you to the WordPress Plugin Repository, where you can explore and install various plugins to enhance your website’s functionality. In the search bar located at the top right corner of the page, type in “WP Mail SMTP by WPForms” to locate the desired plugin.
Once the plugin appears in the search results, click on the “Install Now” button adjacent to it. WordPress will commence the installation process, and upon completion, you’ll be prompted to activate the plugin. Click on the “Activate” button to enable WP Mail SMTP by WPForms on your website. With this initial step completed, you are now ready to proceed with configuring the plugin to setup WordPress SMTP and optimize your email delivery system.
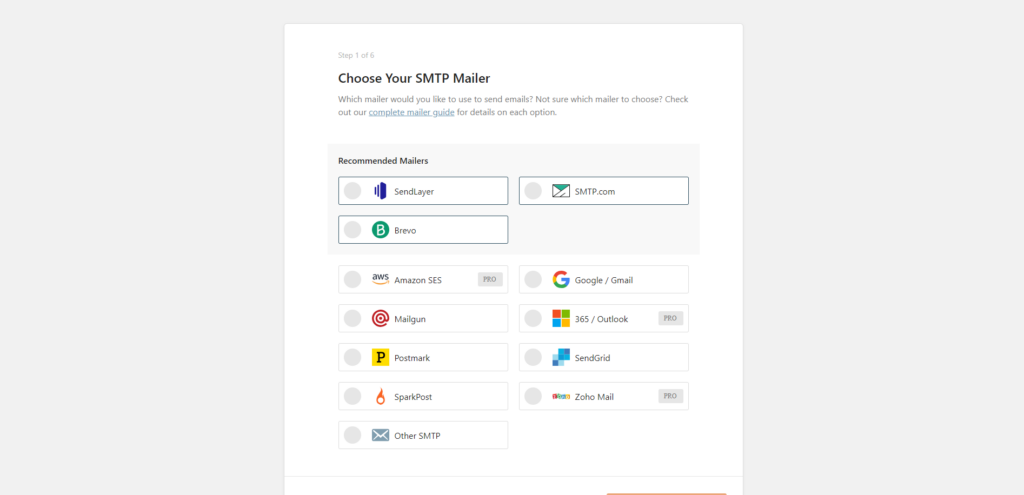
After successfully installing and activating the WP Mail SMTP by WPForms plugin, the next crucial step involves configuring the plugin settings. Upon activation, the plugin seamlessly guides you through the setup process, and the initial task is to select your preferred SMTP mailer.
As you navigate through the configuration process, you will encounter a prompt asking, “Which mailer would you like to use to send emails?” The plugin provides a comprehensive list of recommended mailers, including SendLayer, Brevo, Amazon SES, Mailgun, Postmark, SparkPost, and more. This array of options caters to different preferences and needs, offering flexibility to users.
For the purpose of this guide, let’s consider selecting Mailgun as the SMTP mailer. If you don’t have an existing Mailgun account, the process to create one is straightforward and, importantly, free of charge. To create a Mailgun account, follow these simple steps:
Once these steps are completed, your Mailgun account is ready for use. This seamless integration not only simplifies the process to setup WordPress SMTP but also ensures that you have chosen a reliable and widely used mailer to enhance the efficiency of your website’s email delivery system.
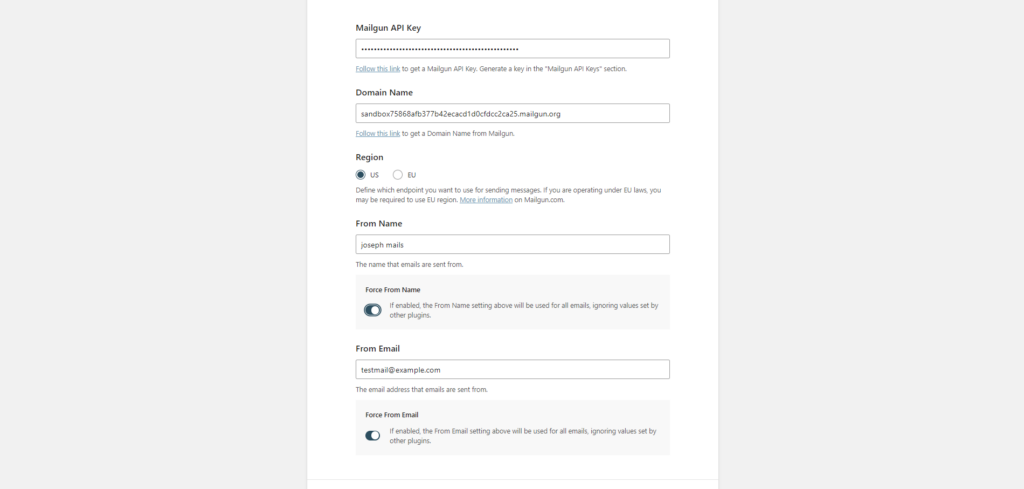
Configuring Mailer Settings is a crucial step in the process to setup WordPress SMTP on your website with the WP Mail SMTP by WPForms plugin, particularly when using Mailgun as your chosen mailer. The WordPress settings can vary depending on the selected mailer, and for Mailgun, the following parameters need attention:
Mailgun API Key: Upon signing up for Mailgun, a primary account API key is generated. This key facilitates all CRUD operations through various API endpoints for your sending domains. To access your primary account API key:
Alternatively, you can follow a provided link to obtain your Mailgun API Key, generating it in the “Mailgun API Keys” section.
Domain Name: Acquiring a domain name from Mailgun is essential. Follow the provided link to obtain this crucial element.
Region: Choose between “US” or “EU” based on your operating region or legal requirements. If adhering to EU laws, opting for the EU region may be necessary.
From Name and Email: Specify the name and email address from which emails will be sent. For example, you can set the From Name as “Testmail” and the From Email as “[email protected].”
Force From Name and Email: Enabling these options overrides values set by other plugins, ensuring consistency in the sender’s name and email across all emails.
These settings, meticulously configured, ensure that Mailgun functions seamlessly as a transactional email provider. It’s noteworthy that Mailgun offers a generous 3-month free trial, followed by a ‘Pay As You Grow’ plan, allowing users to pay based on usage without committing to a fixed monthly rate. By following these detailed steps, you can harness the capabilities of WP Mail SMTP and Mailgun to enhance the reliability and effectiveness of your WordPress site’s email delivery system.
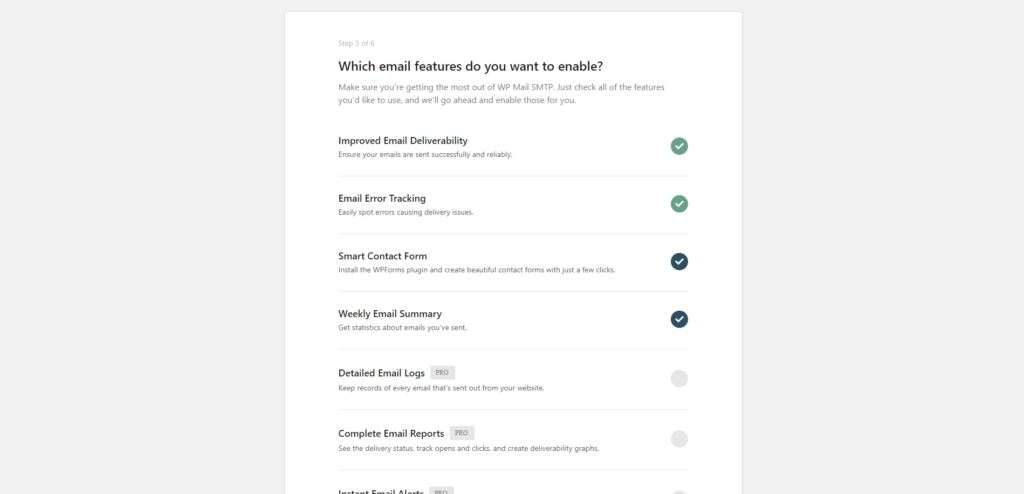
After configuring the Mailer Settings in the WP Mail SMTP by WPForms plugin, the next crucial step is to select the Email Features you want to enable. This step ensures that you maximize the benefits of WP Mail SMTP and tailor its functionalities to your specific needs.
Weekly Email Summary: Stay informed about your email activities with a weekly summary. This feature provides valuable statistics about the emails you’ve sent, offering insights into your communication trends and helping you fine-tune your strategies.
In addition to improving your WordPress SMTP setup’s performance, carefully selecting and enabling these features will also give you valuable insights and control, ultimately improving your site’s overall user experience.
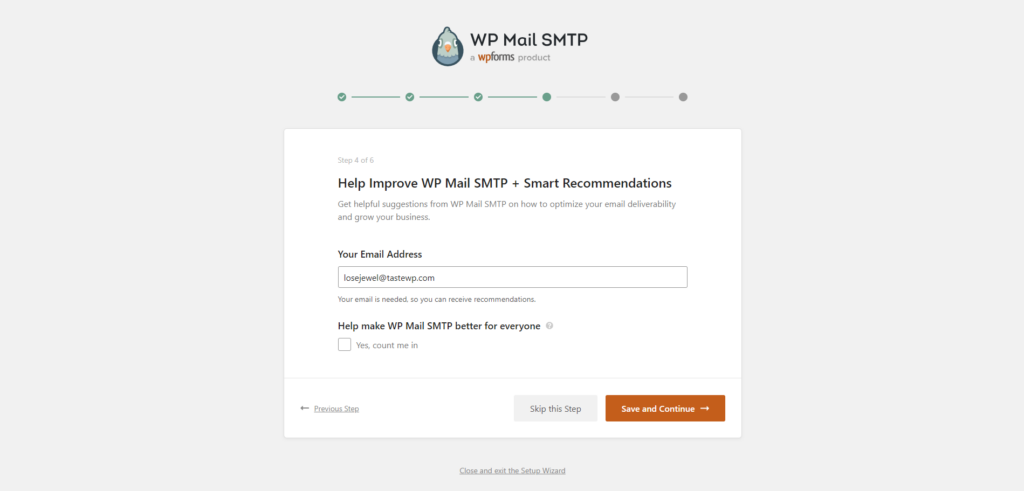
Once you have selected the email features you want to enable in the WP Mail SMTP by WPForms plugin, the next step involves enhancing your experience by enabling the “Help Improve WP Mail SMTP + Smart Recommendations” option. This feature allows you to receive valuable suggestions from WP Mail SMTP on optimizing your email deliverability and expanding your business reach. To activate this feature, you’ll be prompted to provide your email address – a necessary step for receiving personalized recommendations.
By inputting your email address, such as [email protected], you open the door to receiving tailored advice and insights directly related to your email configuration. This collaborative approach not only benefits your individual setup but also contributes to the collective improvement of WP Mail SMTP for all users. By clicking on “Yes, count me in,” you actively participate in making WP Mail SMTP better by sharing anonymized data that helps the developers refine and optimize the plugin based on real-world user experiences.
This collaborative feedback loop ensures that WP Mail SMTP stays current, effective, and user-friendly, making it a valuable asset for WordPress users aiming to streamline their email delivery processes. So, embrace this opportunity to contribute to the improvement of WP Mail SMTP and gain personalized insights that can elevate your email communication game. Moreover this SMTP Plugin is also proved to be one of the best Elementor contact form builder for the website.
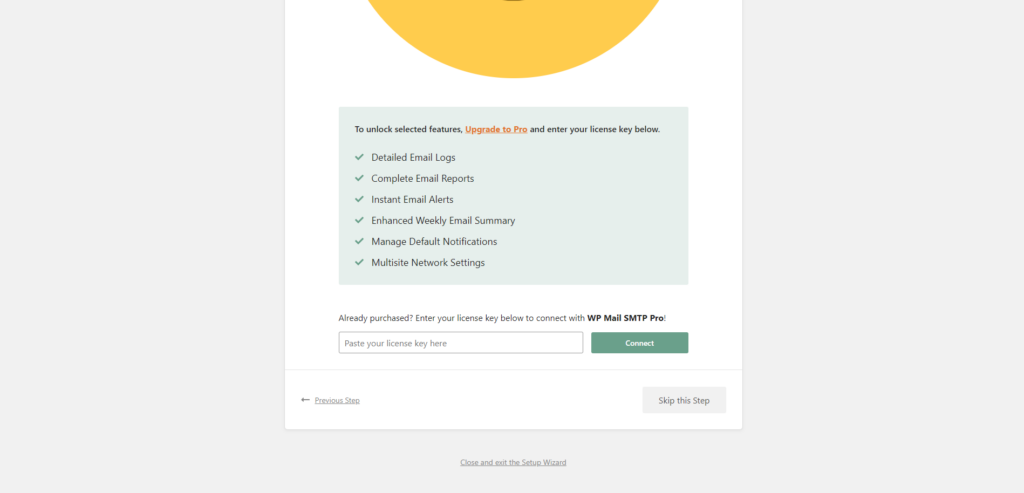
In the next step of setting up WordPress SMTP on your website with the WP Mail SMTP by WPForms plugin, you will encounter the option to enter your WP Mail SMTP license key. If you are currently utilizing WP Mail SMTP Lite, rest assured that no license is required, and you can enjoy the basic functionality of the plugin. However, to unlock a suite of advanced features and capabilities, upgrading to the Pro version is recommended.
By upgrading to the Pro version and entering your license key, you gain access to a host of valuable features that can significantly enhance your email management:
Overall, entering your WP Mail SMTP license key and upgrading to the Pro version unlocks a suite of powerful features, providing you with a more sophisticated and versatile email management system for your WordPress website.
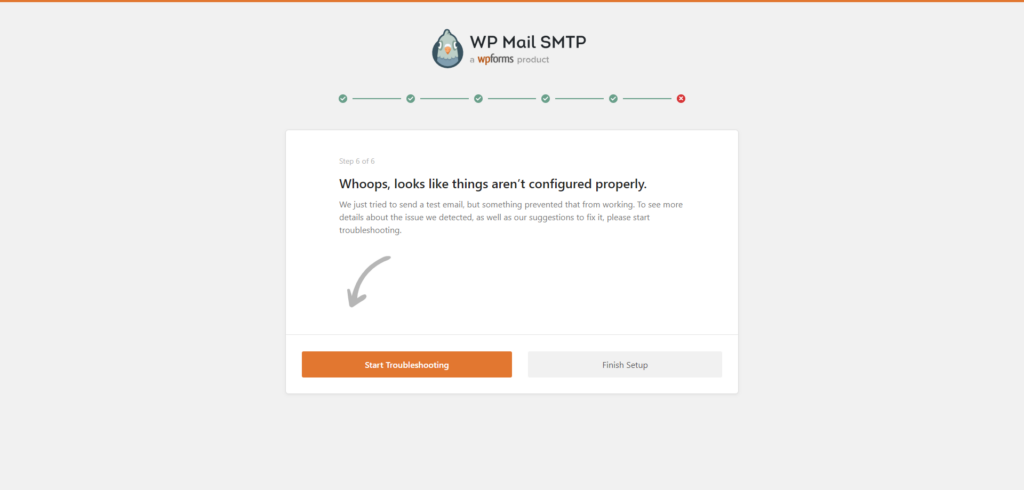
In the final step of setting up WordPress SMTP with the WP Mail SMTP by WPForms plugin, after meticulously configuring your mailer settings and enabling desired features, it’s time to validate the setup and ensure seamless functionality. This pivotal stage acts as a checkpoint to identify any potential errors in your configuration. If discrepancies are detected, the system prompts you to troubleshoot and rectify the issues promptly, providing insights into potential misconfigurations or missing details.
Conversely, if all elements align seamlessly, you can simply proceed to click on the “Finish Setup” button, marking the successful culmination of the WordPress SMTP setup process. This signifies that your website is now equipped to route emails through the designated SMTP server, enhancing the reliability and deliverability of your communication channels.
With the setup officially completed, the next logical step is to conduct a test email. This feature allows you to send a trial email using the configured SMTP settings, ensuring that your WordPress site can effectively dispatch emails without any hindrances. It serves as the final assurance that your SMTP setup is operational and ready to handle the communication demands of your website, providing a user-friendly interface for both setup verification and diagnostic troubleshooting if necessary. Using The SMTP Plugins by WP Forms helps to design small business website which are startups and needs a boost in their initial phase.
In conclusion, the process to setup WordPress SMTP for your website doesn’t have to be a daunting task. By following the prerequisites and the 7-step process outlined in this guide, you can easily configure your site to ensure reliable email delivery. From understanding the SMTP protocol to selecting the right plugin like WP Mail SMTP by WPForms, each step plays a crucial role in streamlining your communication channels.
If you’re still unsure about which SMTP plugin to use, don’t worry! Our previous blog on the 5 best WordPress SMTP plugins offers valuable insights to help you make an informed decision. Remember, choosing the right plugin tailored to your website’s needs can significantly enhance your email delivery system.
With your WordPress SMTP setup complete, you can rest assured that your website’s emails will reach their destination promptly and efficiently, fostering better communication with your audience. So, don’t hesitate to dive in and take control of your website’s email capabilities today!
Here’s a pro tip- Premium WordPress Elementor Themes By WP Elemento are integrated with these SMTP Plugins in order to provide your website with more functionality and also increase Abandoned cart recovery, thereby enhancing sales on your online store. Consider using WordPress Themes and look out for the WordPress theme bundle as well in order to take your website to new levels.
