
Make a splash this summer with 25% off on Bundle of 42+ Elementor WP Themes. Use code “SUNNY25” to unlock the deal.
Sun's out, savings on! Enjoy 25% OFF on all Premium WordPress Themes with code “SUNSHINE25”
Make a splash this summer with 25% off on Bundle of 42+ Elementor WP Themes. Use code “SUNNY25” to unlock the deal.
Sun's out, savings on! Enjoy 25% OFF on all Premium WordPress Themes with code “SUNSHINE25”

If you’re a WordPress website owner, you’ve likely heard about the significance of search engine optimization (SEO) in driving organic traffic to your digital doorstep. One crucial element of SEO that often goes underappreciated is the robots txt file in WordPress website – a small yet mighty tool that can influence how search engines crawl and index your site.
In this blog, we’re diving deep into the world of SEO and shedding light on the pivotal role played by the robots.txt file. While we won’t delve into the basics of what a robots.txt file is or why it’s important, we’re here to provide you with a step-by-step walkthrough on how to seamlessly integrate this powerful tool into your WordPress website.
Whether you’re a seasoned webmaster or a WordPress novice, understanding how to wield the robots txt file in WordPress website effectively can give you a significant edge in the digital realm. From controlling what search engines can access to optimizing crawl budgets, our guide will equip you with the knowledge to fine-tune your website’s visibility and improve its overall SEO performance.
So, buckle up as we embark on a journey to unlock the potential of the robots txt file in WordPress website, unravelling the mysteries of Elementor SEO and empowering your WordPress website to reach new heights in the competitive online landscape.
A robots.txt file serves as a set of directives for search engine crawlers, instructing them on which sections of a website to index and which to ignore. It is a plain text file placed in the root directory of a website, and its primary purpose is to control and guide the behavior of web robots or crawlers, such as those deployed by search engines like Google, Bing, and others.
This file consists of specific rules and commands that inform search engine bots about which areas of a website are open for exploration and which should remain off-limits. Each directive is designed to manage crawler access to different parts of the site, including pages, images, scripts, and other resources. By defining these rules in the robots.txt file, website administrators can exert a level of control over how search engines interact with their content.
The importance of the robots.txt file lies in its ability to influence a website’s search engine visibility and crawl efficiency. Without a well-optimized robots.txt file, search engine bots might end up indexing irrelevant or sensitive content, causing issues with a site’s ranking and potentially leading to privacy concerns. Additionally, the file allows webmasters to conserve server resources by preventing crawlers from accessing certain areas of a site, ultimately optimizing the website’s performance and ensuring a smoother user experience. In essence, the robots.txt file is a crucial tool for website owners and administrators, providing them with a means to fine-tune their online presence and enhance their site’s overall performance in search engine results.
Benefits Of Adding Robots.txt File For Any Website
Adding a robots.txt file to your website comes with a myriad of benefits, as it provides a strategic tool for managing how search engine crawlers interact with your site. Here’s a detailed exploration of the advantages:
Overall, the inclusion of a well-structured robots.txt file is a strategic move for any website owner. It not only enhances the efficiency of search engine crawlers but also plays a pivotal role in optimizing site performance, preserving privacy, and ultimately boosting the overall SEO health of your online presence. Moreover you can do your website’s WordPress Theme SEO Optimization for the best performance of your website.
Adding a robots txt file in WordPress website can be done through either manual coding or by utilizing a plugin. Here’s a detailed guide on both methods.

To add a robots txt file in WordPress website manually, the initial step involves accessing the WordPress dashboard. Upon logging in to the administrative panel, users gain control over various settings and configurations. Navigate to the dashboard by entering the login credentials on the website’s admin page. This centralized hub serves as the command center for website management, allowing users to control content, themes, plugins, and crucial settings.
The accessibility of the WordPress dashboard empowers website owners and administrators to implement essential changes, ensuring the seamless integration of features like the robots.txt file. This initial access sets the stage for subsequent steps, enabling users to navigate through the WordPress ecosystem and make informed decisions about their website’s configuration and optimization.
After logging into your WordPress dashboard, the next step in manually adding a robots.txt file is to navigate to the theme files by accessing the root directory of your WordPress installation. This involves using either an FTP (File Transfer Protocol) client or the file manager provided in your hosting control panel. If opting for an FTP client, such as FileZilla, connect to your web server using the provided credentials, and navigate to the root directory where your WordPress files are hosted. Alternatively, if using the file manager in your hosting control panel, locate the “File Manager” or a similar option, and open the directory where your WordPress installation resides.
Once in the root directory, you can create a new text file named “robots.txt” or edit an existing one. This step lays the groundwork for directly influencing how search engine bots interact with your WordPress website.
Once you’ve accessed the root directory of your WordPress installation, the next step in manually adding a robots txt file in WordPress website involves creating or editing the file itself. If your website doesn’t already have a robots.txt file, you can initiate the process by creating a new text file and naming it “robots.txt.” On the other hand, if the file already exists, proceed to edit its content.
Upon opening the robots.txt file, you enter the realm of directives—commands that dictate the behavior of search engine crawlers. For instance, to grant universal access to all robots for every aspect of your website, you can employ the following directives:
User-agent: * Disallow:
These lines essentially tell search engine bots that there are no restrictions, granting them permission to crawl and index all content on your site. Conversely, if you wish to prohibit all robots from accessing a specific directory, you can implement the following directives:
User-agent: * Disallow: /example-directory/
In this case, the directives instruct search engines to refrain from indexing any content within the specified “example-directory.” These directives are essential for tailoring the behavior of search engine crawlers to align with your website’s structure and privacy considerations, ensuring optimal performance and adherence to your preferences.
After making necessary modifications to your robots txt file in WordPress, the crucial next step is to save these changes and upload the file to the root directory of your WordPress installation. Saving the file ensures that your directives and configurations are preserved. Once saved, you need to upload the file to the root directory using either an FTP client or your hosting control panel’s file manager.
This involves navigating to the directory where your WordPress is installed and placing the robots.txt file there. This step is pivotal because the robots.txt file must reside in the root directory for search engine crawlers to locate and interpret it. Without this upload, the changes won’t take effect, and your website won’t benefit from the specified instructions guiding search engine bots on crawling and indexing. After completing this step, it’s advisable to verify the file’s effectiveness using tools like Google Search Console.
Verifying the effectiveness of your manually added robots txt file in WordPress website is crucial to ensuring its proper functioning. Google Search Console is a powerful tool that allows you to validate and test your robots.txt directives. After uploading or editing the file, navigate to Google Search Console and select your website property. In the “Crawl” section, you’ll find the “robots.txt Tester.”
Here, you can submit your robots.txt file for testing and see how search engines interpret its directives. This tool provides insights into any potential issues, such as syntax errors or misconfigurations, allowing you to make necessary adjustments. Additionally, third-party SEO tools can be employed for verification, offering alternative perspectives on your robots.txt file’s performance and ensuring that your website is effectively guiding search engine crawlers as intended. Regular verification is essential for maintaining a well-optimized and search engine-friendly website.

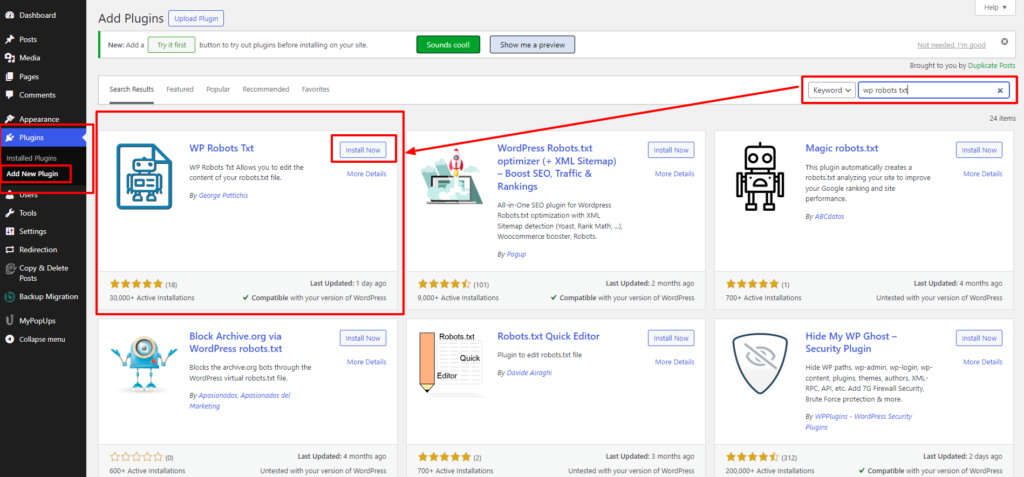
To begin the process of adding a robots txt file in WordPress website using a plugin, the first step is to access your WordPress admin panel. Log in to your website’s dashboard, usually located at yourdomain.com/wp-admin. Once logged in, navigate to the “Plugins” section on the left-hand menu and click on “Add New.”
In the Plugins section, you’ll find a plethora of options, including popular SEO plugins like Yoast SEO, Rank Math, and others. Additionally, there are dedicated plugins such as “WP Robots Txt” that specifically cater to managing the robots.txt file. These WordPress plugins often offer a user-friendly interface, making it easier for users with varying levels of technical expertise.
To proceed, initiate a search for a robots.txt plugin in the provided search bar. For instance, you can enter “Yoast SEO” or “WP Robots Txt.” Browse through the search results and choose the plugin that aligns with your preferences and requirements. Once you’ve selected the desired plugin, click on the “Install Now” button to initiate the installation process.
After the installation is complete, click on the “Activate” button to enable the plugin on your WordPress site. With the plugin now active, you gain access to a range of settings and features that facilitate the configuration and management of your robots.txt file. This marks the initial step in integrating a robots.txt file into your WordPress website, offering a convenient and user-friendly approach to enhance your site’s search engine optimization.

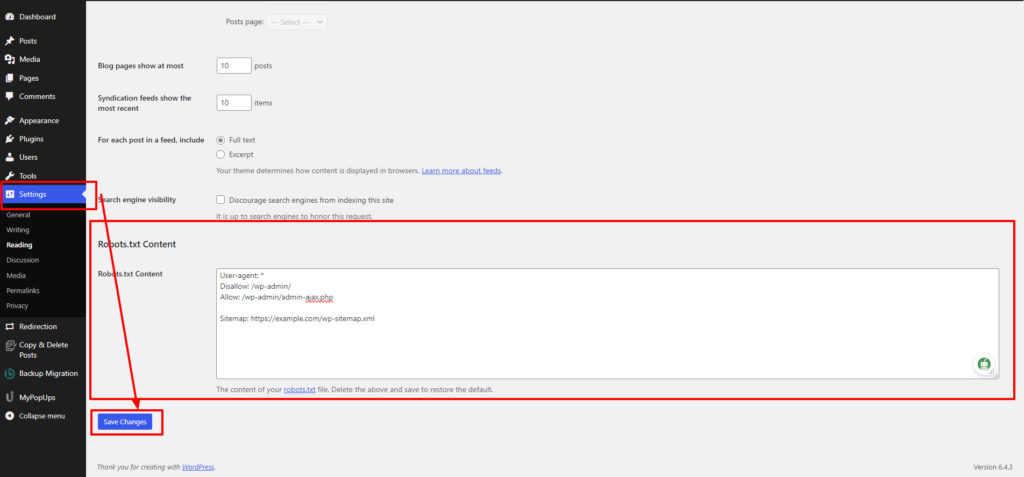
After activating the WP Robots Txt plugin on your WordPress website, the next crucial step is to navigate to the plugin settings, typically located within the general settings section of your WordPress admin panel. The process may slightly vary depending on the plugin you’ve chosen, but most SEO plugins, such as Yoast SEO or Rank Math, follow a similar structure.
Once in the plugin settings, locate the section specifically designated for robots.txt configuration. This is where you’ll fine-tune the directives that guide search engine crawlers on how to interact with your site. The configuration options provided by the plugin often include a user-friendly interface, allowing even those with limited technical expertise to customize their robots.txt file.
In this section, you’ll have the opportunity to input directives such as allowing or disallowing specific user agents, restricting access to certain directories, or excluding particular types of content from indexing. Some plugins also provide default settings that align with best practices for SEO, making it easier for users who may not be familiar with the intricacies of robots.txt customization.
As you configure the robots.txt settings, it’s essential to align them with your website’s structure and content goals. For instance, if there are areas you prefer search engines not to crawl, or if you want to prioritize the indexing of specific pages, this is where you articulate those preferences.
After making the desired configurations, remember to save the changes. The plugin will then automatically generate and update the robots.txt file based on your settings, ensuring that search engine bots interpret and adhere to your directives during the crawling and indexing process. Lastly, it’s prudent to verify the effectiveness of your robots.txt file using tools like Google Search Console to ensure that your website’s visibility aligns with your SEO strategy.

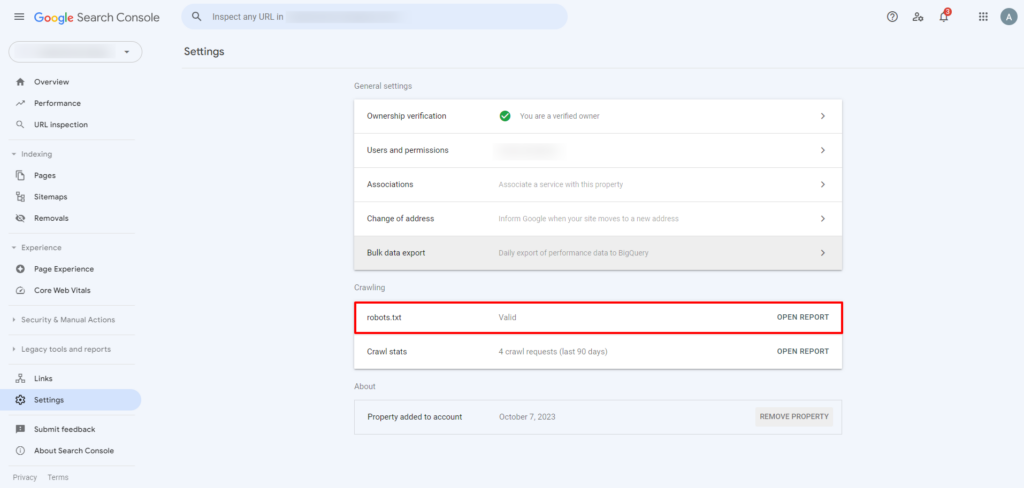
Once you’ve added a robots txt file in WordPress website using a plugin, the next crucial step is verification. Utilizing tools like Google Search Console is instrumental in ensuring that your robots.txt file is accurately configured through the chosen plugin. Begin by logging into your Google Search Console account and selecting the property (website) you’re working on. Navigate to the “Index” section and click on “Coverage.” Within the Coverage report, you’ll find an option to view the details of your robots.txt file.
Google Search Console will provide insights into any errors or warnings associated with the file, allowing you to identify and rectify potential issues promptly. Verifying the correct configuration ensures that search engine crawlers interpret and follow your directives accurately, optimizing your website’s visibility and performance in search engine results. Regular checks through tools like Google Search Console contribute to maintaining an effective and error-free robots.txt setup for your WordPress website. Also you can install Google Site Kit WordPress Plugin to easily access the analytics of your website.
Using a plugin simplifies the process, especially for users who may not be comfortable with manual coding. These plugins often offer user-friendly interfaces and additional SEO features. Whether you choose manual coding or a plugin, regularly review and update your robots.txt file to adapt to changes in your website structure and content.
In conclusion, delving into the world of the robots txt file in WordPress website has been a journey toward enhancing your website’s search engine optimization (SEO) prowess. From understanding the core concept and significance of this file to exploring the myriad benefits it offers, our exploration has equipped you with valuable insights. Whether you choose the manual route, carefully coding directives to control crawler behavior, or opt for the simplicity and convenience of plugins, the goal remains the same – to optimize your website’s visibility and performance.
By comprehending the nuances of robots.txt, you’ve gained control over how search engine crawlers interact with your content, preserving resources, ensuring privacy, and contributing to an improved user experience. Implementing these strategies aligns seamlessly with broader SEO goals, ultimately bolstering your website’s position in search engine results. As you navigate the dynamic landscape of digital presence, the robots.txt file stands as a vital tool in your arsenal, empowering you to shape how your WordPress website is perceived and ranked across the vast expanse of the online realm.
If you are searching for a professional WordPress theme that is fully optimized for the SEO you can look for the best WordPress Elementor themes by WP Elemento where you can get 35+ different variety of themes that are fully optimized for SEO or you can also go for the WordPress Theme Bundle where you can get all of the themes under one roof. What are you waiting for? get your perfect fit for the website now!
