Are you ready to turn your passion or expertise into a thriving online community and revenue stream? Creating a membership website is a fantastic way to achieve just that. Whether you’re an artist, fitness guru, educator, or business owner, creating a membership website can help you monetize your content and connect with a like-minded audience.
In this blog, we’ll walk you through the process of setting up your very own membership website with WordPress, it’s power and flexibility. WordPress is the most popular content management system in the world, known for its user-friendly interface and an extensive library of plugins and themes that make it a great choice for building a membership site.
The beauty of a membership website lies in its ability to offer exclusive content, community engagement, and monetization opportunities. By following the five simple steps we’ll outline, you can establish a secure and engaging online space for your members, ensuring they get value and are willing to pay for it.
Whether you’re a seasoned WordPress user or just getting started, our guide will provide you with the knowledge and confidence you need to create a membership website that suits your unique goals. So, let’s get started on your journey to online community and financial success!
What Is A Membership Website?
A membership website is a type of online platform that provides exclusive content, products, or services to individuals who have paid for access. Users typically become members by signing up, often through a subscription or one-time payment model, and once they have gained access, they can enjoy various benefits, such as premium content, community forums, resources, or other perks that non-members cannot access.
Membership websites are used by a wide range of businesses and organizations that want to establish a loyal and engaged customer or user base. Here are some examples of businesses and niches that commonly benefit from membership websites:
- Content Creators and Bloggers: Many bloggers, writers, podcasters, and YouTubers use membership websites to offer exclusive articles, videos, podcasts, or other content to their subscribers.
- Online Courses and E-Learning: Educational platforms, like online course providers, often utilize membership websites to grant students access to course materials and forums.
- Professional Associations: Industry-specific associations and organizations may offer members access to research, events, and resources.
- Digital Product Sellers: Digital product creators, like software developers or graphic designers, use membership sites to distribute software, templates, or design assets to paying customers.
- Fitness and Wellness: Personal trainers, nutritionists, and yoga instructors can provide members with workout routines, meal plans, and wellness tips.
- News and Publications: Some news outlets offer premium articles or early access to news to paying subscribers.
- Online Communities: Niche communities and forums use membership websites to create a sense of exclusivity and to fund their operations.
- Nonprofits and Charities: Organizations may offer members special access to events, information, or volunteer opportunities.
- eCommerce: Some online stores use membership models to offer exclusive discounts, free shipping, or early access to new products.
Membership websites provide a way for these businesses to generate recurring revenue, build a dedicated and engaged community, and offer a personalized experience to their members. The specific model and benefits vary depending on the niche and business objectives.
How To Create A Membership Website With WordPress?
Creating a membership website can be a rewarding venture, allowing you to monetize your content or services while building a loyal online community. Here are the detailed steps to help you get started on this exciting journey.
Step 1: Choose A Domain Name And Hosting
The initial step in creating a membership website is choosing a domain name and selecting a reliable web hosting provider. This foundational decision forms the bedrock of your online presence.
First, let’s consider the domain name. Your domain name should be a unique and memorable web address that reflects your brand or niche. It’s the first thing your potential members will see and remember, so it’s crucial to select one that aligns with your website’s purpose and is easy to recall. Whether you opt for a domain that directly mirrors your brand or one that incorporates keywords related to your niche, the aim is to make it easy for your target audience to find and remember your site.
Once you’ve settled on a domain name, the next step is to choose a web hosting provider. WordPress recommends hosting services like Bluehost, SiteGround, or WP Engine for good reason. These providers offer one-click WordPress installations, simplifying the setup process significantly. The hosting provider plays a crucial role in ensuring your website is accessible, secure, and responsive. It stores all your website files, making them accessible to visitors around the world. The reliability and performance of your hosting service can significantly impact the user experience and, ultimately, the success of your membership site.
The domain name and hosting provider represent the critical foundation upon which you’ll build your membership website. Careful consideration and selection at this stage will set the stage for a smooth and successful website creation process.
Step 2: Install WordPress
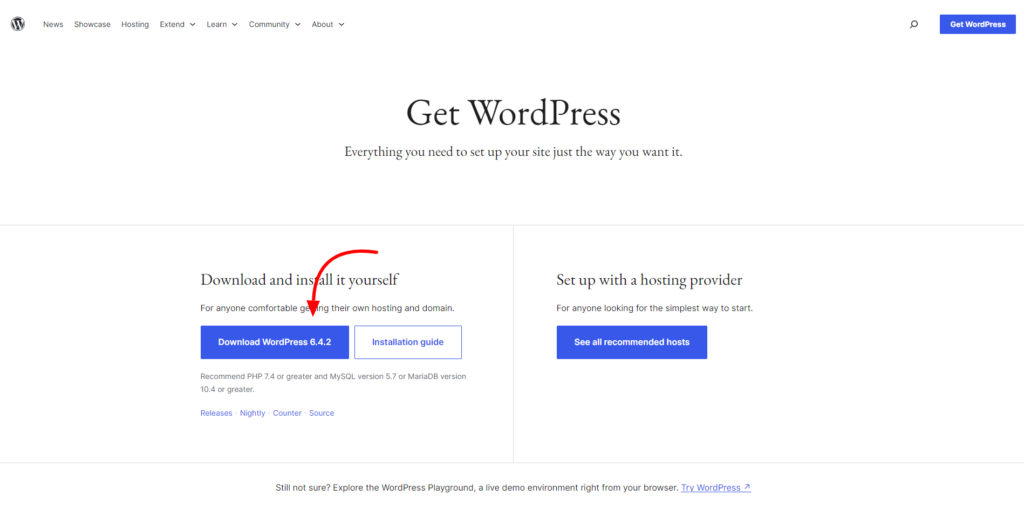
After selecting a hosting provider for your membership website, the next crucial step is to install WordPress. Fortunately, this process is relatively straightforward, and most hosting providers make it incredibly user-friendly. Here’s how to get started:
Once you’ve signed up with your chosen hosting provider, they typically offer a one-click installation process. This means you won’t need to dive into complex technical details or coding – it’s all done with a few simple clicks.
Upon initiating the installation, you’ll be prompted to choose a few basic settings, such as your domain name and any subdirectories, if necessary. You can also set your website’s title and tagline at this stage. The hosting provider’s installation wizard will handle the rest, including the creation of the necessary WordPress database and configurations.
After the installation is complete, you will get login credentials for your WordPress dashboard. This dashboard serves as the central control panel for your website. You can access it by navigating to your website’s URL followed by “/wp-admin” (e.g., “www.yourwebsite.com/wp-admin“).
In your WordPress dashboard, you gain complete control over your site’s content, design, and functionality. You can start customizing your site’s appearance with themes, adding plugins for additional features, and creating and managing pages and posts. It’s the nerve center from which you’ll build and manage your membership website.
Step 3: Install And Activate Theme
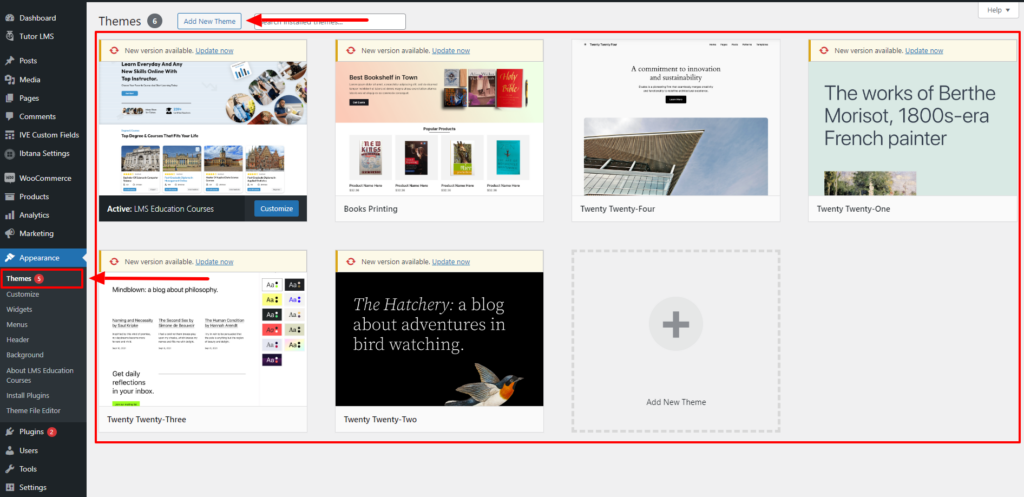
Once you’ve installed WordPress and logged into your dashboard, the next critical step in creating your membership website with WordPress is to select and activate the perfect theme. WP Elemento offers a variety of premium Elementor WordPress themes, catering to a range of niches, including Education, Fitness, Water sports, Books shop, Trekking, and News. These themes are not only visually appealing but also well-optimized for Elementor, ensuring a hassle-free customization experience.
To get started, choose a theme that best aligns with your website’s goals and aesthetics, and make a purchase. Once you’ve acquired your theme, the next step is to upload and activate it within your WordPress dashboard.
To install a WordPress theme for your membership website, navigate to the ‘Appearance’ section in your WordPress dashboard, click on ‘Themes,’ then select and install the WordPress Elementor themes that suits your design preferences. The theme will guide you through the process, often including the installation of essential plugins like Elementor and other required components.
Additionally, many themes offer the option to import demo content, which can serve as a helpful starting point for your website. This content can later be customized and tailored to meet your specific requirements, saving you time and effort in setting up your membership site. With your theme in place, you’re now ready to proceed with the design and content creation for your membership website.
Step 4: Select A Membership Plugin
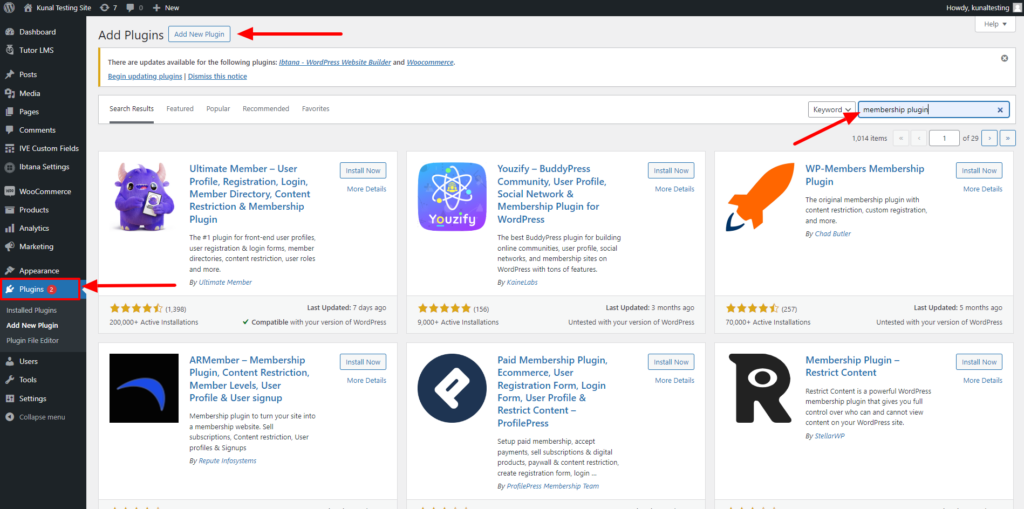
The next crucial step in creating a membership website with WordPress is to select and install a suitable membership plugin. These plugins play a pivotal role in establishing the framework for your membership system, allowing you to set up subscription plans, control content access, and manage user interactions effectively.
One popular choice among WordPress users is the “Paid Memberships Pro” plugin, which provides a comprehensive suite of tools for membership site creation. This versatile plugin is known for its Content Restriction, User Registration, and Paid subscription features, making it an excellent choice for both beginners and experienced website owners.
Paid Memberships Pro boasts over 90,000 active installations, indicating its reliability and popularity within the WordPress community. One of its key advantages is the regular updates provided by the developer, ensuring that your membership site remains secure, up-to-date, and compatible with the latest WordPress versions.
To integrate this plugin into your WordPress site, follow these simple steps. First, access your WordPress dashboard, navigate to the “Plugins” section, and click on “Add New.” In the search bar, type “Paid Memberships Pro,” and the plugin should appear in the search results. In order to activate the plugin, click “Install Now” and then “Activate”.
With Paid Memberships Pro or a similar plugin in place, you’re well on your way to configuring subscription plans, content access rules, and managing user access, bringing you one step closer to launching a successful membership website.
Step 5: Configure Your Membership Plugins Setting
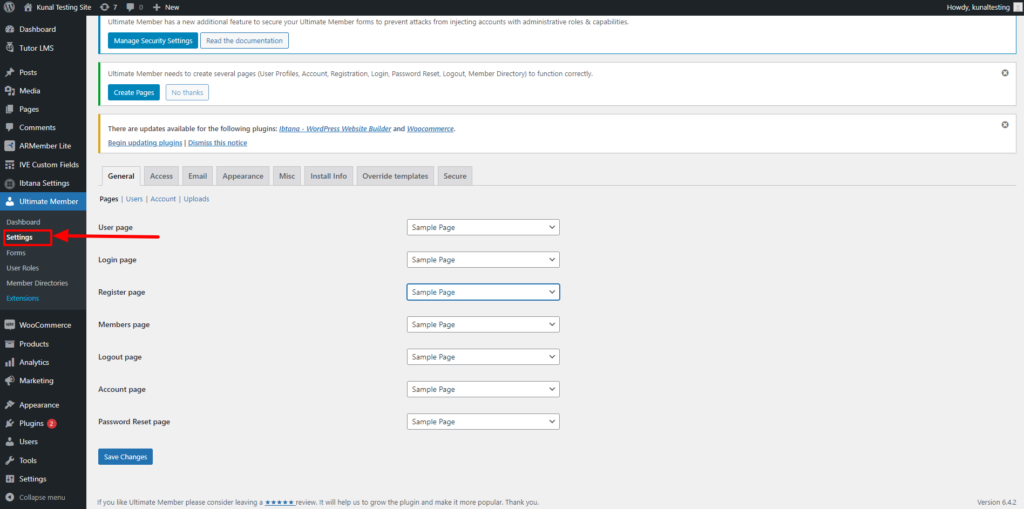
After you’ve activated your chosen membership plugin, it typically guides you through a setup wizard to streamline the configuration process. This is one of the important steps of creating a membership website. In this setup, you first select the type of membership site you’re creating. You’ll find various options like Association, Blog/News, Community, Courses, Directory/Listings, Paid Newsletter, Podcast, Video, or Other. This choice helps the plugin understand the nature of your site and its specific requirements.
Next, you will be prompted to generate the necessary plugin pages, such as registration, login, account management, and content access pages. These pages are essential for creating a seamless user experience.
Following this, you need to set your site’s currency, a crucial step for membership pricing. This ensures that your payment gateway transactions are accurate and user-friendly. Common options include USD, EUR, GBP, and many others.
Now, it’s time to define your membership levels. You can choose to create Free Membership Levels or Paid Membership Levels. For each level, provide a Level Name and set a Fee along with the subscription duration. Paid levels enable you to monetize your site, while free levels can serve as entry points or teaser memberships to entice users.
Once you’ve established your membership levels, you can delve into the finer details. Customize the content accessibility for each level. This includes posts, pages, videos, and any other digital resources you offer. You can restrict access based on membership levels, ensuring that only eligible members can view specific content.
With these initial configurations completed, you’re ready to start creating content tailored to your members. This content might encompass articles, videos, e-books, forums, or any other resources you’ve envisioned. Your membership plugin allows you to effectively restrict access, ensuring that members at different levels only see what they’ve paid for, creating a personalized experience.
After you’ve activated your chosen membership plugin, it typically guides you through a setup wizard to streamline the configuration process. This is one of the important steps of creating a membership website with WordPress. In this setup, you first select the type of membership site you’re creating. You’ll find various options like Association, Blog/News, Community, Courses, Directory/Listings, Paid Newsletter, Podcast, Video, or Other. This choice helps the plugin understand the nature of your site and its specific requirements.
Next, you will be prompted to generate the necessary plugin pages, such as registration, login, account management, and content access pages. These pages are essential for creating a seamless user experience.
Following this, you need to set your site’s currency, a crucial step for membership pricing. This ensures that your payment gateway transactions are accurate and user-friendly. Common options include USD, EUR, GBP, and many others.
Now, it’s time to define your membership levels. You can choose to create Free Membership Levels or Paid Membership Levels. For each level, provide a Level Name and set a Fee along with the subscription duration. Paid levels enable you to monetize your site, while free levels can serve as entry points or teaser memberships to entice users.
Once you’ve established your membership levels, you can delve into the finer details. Customize the content accessibility for each level. This includes posts, pages, videos, and any other digital resources you offer. You can restrict access based on membership levels, ensuring that only eligible members can view specific content.
With these initial configurations completed, you’re ready to start creating content tailored to your members. This content might encompass articles, videos, e-books, forums, or any other resources you’ve envisioned. Your membership plugin allows you to effectively restrict access, ensuring that members at different levels only see what they’ve paid for, creating a personalized experience.
Step 6: Design Or Customise Your Website
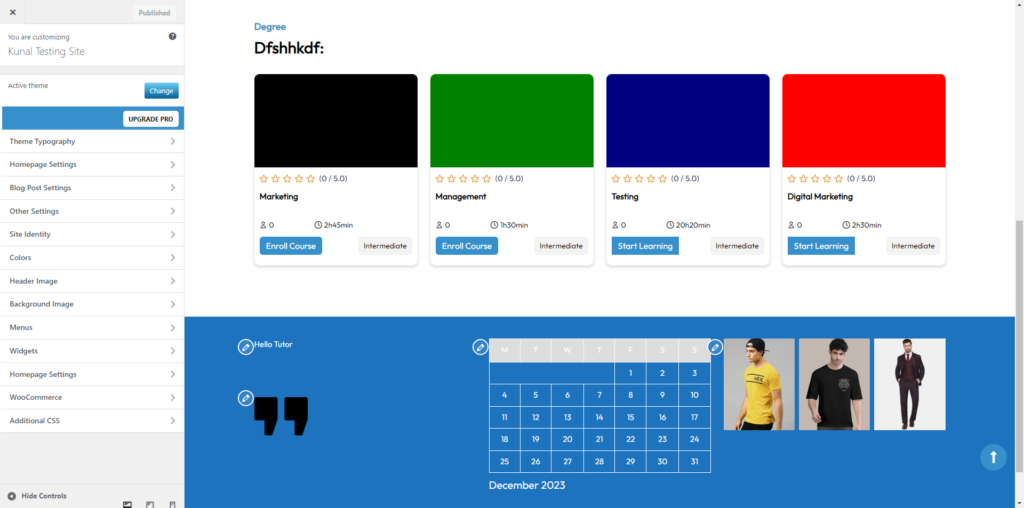
The next crucial step in creating a membership website with WordPress is to design and customize your site. This step is essential because it sets the tone for the user experience and helps establish a strong brand identity. Here’s a more detailed explanation:
Designing Your Website: The design of your website plays a significant role in attracting and retaining members. Begin by selecting a WordPress theme that aligns with your brand and the overall tone you want to convey. There are thousands of themes available, and many of them are designed to work seamlessly with membership plugins, ensuring a smooth user experience.
Customizing Layout, Colors, and Typography: Once you’ve chosen a theme, you can customize it to reflect your unique vision. WordPress provides user-friendly customization options. You can alter the layout, choosing from various page templates, and arrange elements to suit your content. Adjust colors to match your brand’s color scheme, ensuring a consistent and visually appealing appearance throughout your site. Typography choices are essential for readability and aesthetics, so select fonts that are easy to read and align with your brand identity.
Logo and Branding Elements: Incorporate your logo and branding elements into the site design. These visual cues help users identify with your brand and create a sense of trust and recognition. Make sure your logo and branding elements are prominently displayed in headers, footers, and other strategic locations.
Mobile Responsiveness: Ensure that your site is mobile-responsive. Many users access websites on smartphones and tablets, so it’s crucial that your site adapts to various screen sizes and remains functional and visually appealing on all devices.
By customizing your website’s appearance with a well-chosen theme, personalized layout, colors, typography, and branding elements, you can create a professional and engaging user experience. A visually appealing and user-friendly website will not only attract potential members but also keep them coming back for more, making them more likely to stay and engage with your membership content.
Step 7: Test Your Site And Launch Your Membership Site
Before launching your membership site, it’s absolutely critical to conduct comprehensive testing to ensure a seamless and glitch-free experience for your users. Begin with user registration. Check if the registration process is user-friendly, and ensure that users receive confirmation emails promptly. Verify that the login and password recovery mechanisms work smoothly.
Next, focus on payment processing. Test various aspects of this functionality, such as subscription sign-ups, payment gateways, and the processing of recurring payments. Make sure that users can upgrade or downgrade their memberships without any issues.
Content access is a core aspect of a membership site, so it’s imperative to verify that members can access the content they’ve paid for while non-members are appropriately restricted. Test the restrictions on posts, pages, and media to guarantee that members see what they’re supposed to and non-members are prompted to join.
Additionally, if your membership site includes interactive features like forums, member chats, or private messaging, thoroughly test these to ensure they function smoothly. Make sure users can post, reply, and communicate without disruptions.
Once you’re confident that your site is fully functional and user-ready, it’s time to officially launch it to the public. To maximize the impact of your launch, follow these steps:
- Promotion: Develop a pre-launch marketing strategy to create anticipation. Use social media, email newsletters, and your existing web presence to inform your audience about the upcoming launch.
- Marketing Channels: Promote your membership site through various channels, such as social media advertising, content marketing, email marketing, and even paid advertising if it aligns with your budget.
- Target Audience: Clearly define your target audience and tailor your marketing efforts to attract members who would benefit the most from your content or services.
- Launch Event: Consider hosting a launch event, webinar, or live stream to engage with your audience directly and provide insights into the benefits of becoming a member.
- First Impressions: Ensure that your site is user-friendly, aesthetically pleasing, and provides a seamless experience from the moment a potential member lands on your homepage.
Launching your membership website with WordPress is an exciting step, but it’s crucial to keep refining and improving your site based on user feedback and changing needs. Consistent effort in content creation, community management, and marketing will help you grow your membership base and build a successful online community.
Conclusion
In conclusion, we’ve embarked on a journey through the world of membership websites, understanding their significance and the diverse range of businesses and niches they serve. Whether you’re an educator, content creator, or entrepreneur, a membership site can open new doors to engaging with your audience and generating revenue.
We’ve also explored the seven essential steps to create a membership website. From securing a domain name to launching your site, each step is a building block in your path to success. Choose a suitable WordPress theme compatible with membership plugins. Look for responsive, user-friendly themes optimized for membership sites. You can also visit our WordPress Theme Bundle to checkout amazing collection of themes. These steps encompass everything from choosing the right hosting to customizing your site’s design, and, most importantly, delivering exclusive content to your members.
With your WordPress-powered membership site, you have the tools and knowledge needed to create a thriving online community and a sustainable income stream. However, remember that your journey doesn’t end with the launch. Regular maintenance, content updates, and responsive community management will be key to long-term success.
So, as you take these insights and steps forward, you’re well-equipped to create a membership website with WordPress that not only fulfills your goals but also provides value and exclusivity to your members. Your journey to a flourishing online community begins now. Good luck, and may your membership site thrive!


