
Make a splash this summer with 25% off on Bundle of 42+ Elementor WP Themes. Use code “SUNNY25” to unlock the deal.
Sun's out, savings on! Enjoy 25% OFF on all Premium WordPress Themes with code “SUNSHINE25”
Make a splash this summer with 25% off on Bundle of 42+ Elementor WP Themes. Use code “SUNNY25” to unlock the deal.
Sun's out, savings on! Enjoy 25% OFF on all Premium WordPress Themes with code “SUNSHINE25”

Welcome back to our ongoing exploration of enhancing your website’s user experience! In our previous blog post, we unveiled the 7 Best FAQ Plugins designed to incorporate a Frequently Asked Questions section into your website effortlessly. However, the journey doesn’t end there. Today, we’re taking a closer look at an alternative method—one that doesn’t involve plugins.
Adding an FAQ Section on Website is pivotal for clarifying your audience and streamlining their navigation. While plugins offer a convenient solution, some website owners prefer a more hands-on approach, steering clear of additional plugins for various reasons such as simplicity, customization, or reducing the site’s reliance on third-party tools.
In this blog, we’ll guide you through integrating an FAQ section on your website. Whether you’re inclined towards the efficiency of plugins or the autonomy of manual implementation, we’ve got you covered. Let’s explore both methods in-depth, empowering you with the knowledge to choose the approach that aligns seamlessly with your website goals.
Adding a FAQ section on website is a strategic move to enhance user experience and provide valuable information. Let’s walk you through two distinct methods: one involving the use of WordPress plugins and the other without, offering you the flexibility to choose the approach that best suits your website’s needs.
WordPress, being a widely used content management system, offers an array of plugins that simplify the process of incorporating an FAQ section on website. Follow these detailed steps to achieve this effortlessly. Ultimate FAQ – WordPress FAQ and Accordion Plugin by Etoile Web Design stands out as a robust tool for seamlessly integrating a dynamic FAQ section into your WordPress website. Follow these comprehensive steps to leverage the functionalities of this plugin and create an engaging FAQ section.
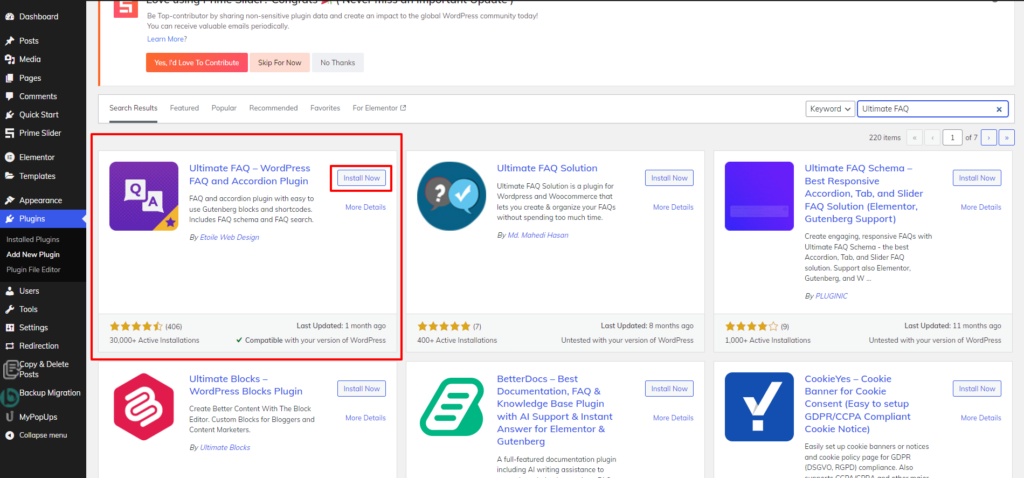
Step 1: Install and Activate Ultimate FAQ Plugin
To initiate the process of adding an FAQ section on website using the Ultimate FAQ Plugin, begin by accessing your WordPress dashboard. Within the dashboard, navigate to the “Plugins” tab, and from the dropdown menu, select “Add New.” Subsequently, in the search bar, enter “Ultimate FAQ” to locate the plugin. Once the plugin is identified, click on the “Install” button, initiating the download and installation process. Following a successful installation, activate the plugin by clicking on the “Activate” button.
This crucial step enables the Ultimate FAQ Plugin’s functionality on your website, unlocking a suite of features for crafting and managing your Frequently Asked Questions section seamlessly. With the plugin now active, you’re ready to proceed with configuring and customizing your FAQ section to meet the specific needs and design preferences of your website.
Step 2: Create FAQs
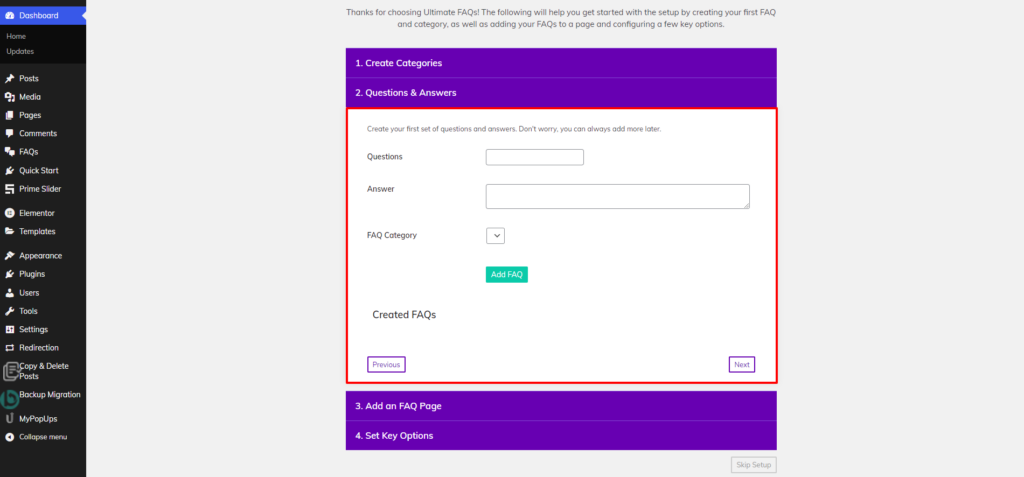
Once you’ve activated the Ultimate FAQ plugin on your WordPress website, the next crucial step involves creating your FAQs. The plugin seamlessly guides you through this process with its intuitive and user-friendly interface. Upon activation, the plugin prompts you to set up a dedicated custom pages in WordPress where you can craft and organize your frequently asked questions.
Begin by creating categories, a fundamental organizational feature. Categories allow you to structure your FAQs for easy navigation, benefiting both you and your visitors. You’ll be prompted to provide a Category Name and a Category Description, ensuring clarity and relevance.
The next step involves adding your questions and their corresponding answers. The plugin encourages you to initiate your FAQ database by creating your first set of questions and answers. Notably, the flexibility of the Ultimate FAQ plugin allows for continuous expansion, reassuring you that you can always add more FAQs later. During this process, you’ll specify the FAQ Category you previously created, further enhancing the organization of your content.
You have the option to create a dedicated FAQ page through the plugin, or alternatively, you can skip this step and seamlessly integrate your FAQs into an existing page that you’ve manually created. This flexibility accommodates various website structures and design preferences.
As a crucial part of the setup, the plugin directs you to set key options that dictate the behavior of your FAQ section. You can decide whether the FAQs should function as an accordion, with only one FAQ open at a time (requiring FAQ Toggle), whether FAQs should open on a separate page, whether they should be grouped by category, and how individual FAQs should be ordered.
Once you’ve carefully configured these options according to your preferences, you can click on “Finish” to complete the process. This step-by-step guide ensures that your FAQ section on website is not only functional but also well-organized and tailored to your website’s specific needs.
Step 3: Configure Plugin Settings
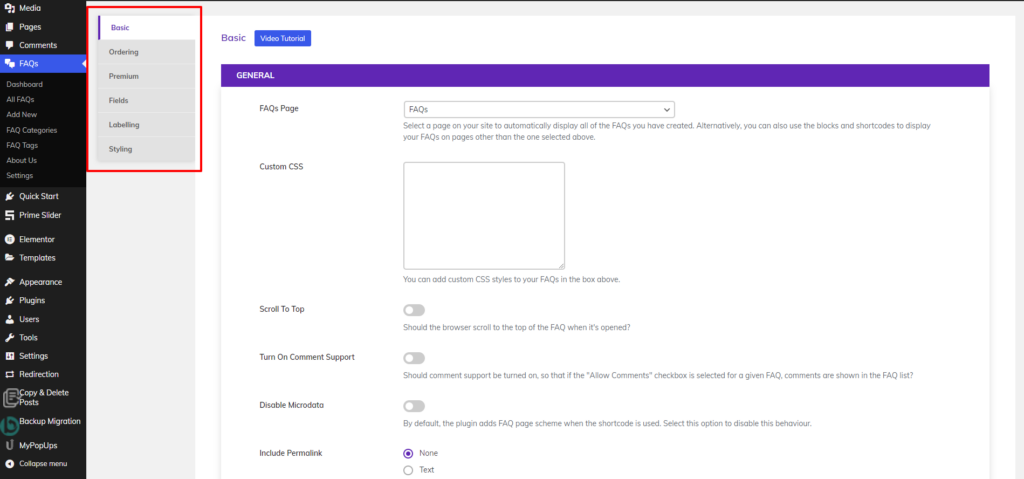
Configuring the plugin settings is a pivotal step in tailoring the appearance and functionality of your FAQ section on website. In the General Settings section, you have the option to define how your FAQs are presented on your site. The “FAQs Page” setting allows you to select a specific page where all your FAQs will automatically be displayed. Alternatively, you can use blocks and shortcodes to exhibit your FAQs on pages other than the selected one, providing flexibility in placement.
The “Custom CSS” option empowers you to add personalized styling to your FAQs, ensuring they seamlessly integrate with your website’s design. You can enhance the visual appeal and match the FAQ section with your overall WordPress Elementor themes on your website.
In the Functionality Settings, various options control how users interact with your FAQs. Choices such as “Disable FAQ Toggle” determine whether FAQs should open on a separate page, while “FAQ Accordion” decides if only one FAQ is open at a time, requiring FAQ Toggle. “FAQ Category Toggle” determines if categories should hide or open when clicked, especially if FAQs are grouped by category.
The Display Settings offer customization options such as hiding categories or tags, displaying all answers at page load (be cautious if FAQ Accordion is on), showcasing post author and creation date, and adding a ‘Back to Top’ link for user convenience.
In the Ordering Settings, decisions on grouping FAQs by category, ordering criteria (created date, title, modified date), and sorting order (ascending or descending) can be configured. These settings collectively shape the user experience of your FAQ section on website, providing a tailored and efficient information delivery system. Note that additional premium settings may further refine and elevate the functionality of your FAQ section, depending on your specific needs and preferences.
Step 4: Test and Live FAQ Section
Before making your FAQ section live, thoroughly test its functionality and appearance. Ensure that questions and answers display correctly, and all configured options behave as intended. Pay attention to the design elements, responsiveness, and user experience. Once satisfied with the testing phase, publish your FAQ section on website, providing your audience with a valuable resource for addressing common queries and enhancing their interaction with your website. Regularly update the FAQ section to incorporate new information and maintain its relevance.
Advantages of Using Plugins:
Challenges of Using Plugins:
For those seeking a more hands-on and plugin-free approach to adding an FAQ section on website, manual coding provides greater control over design and functionality. Follow these detailed steps to create an FAQ section without relying on plugins.
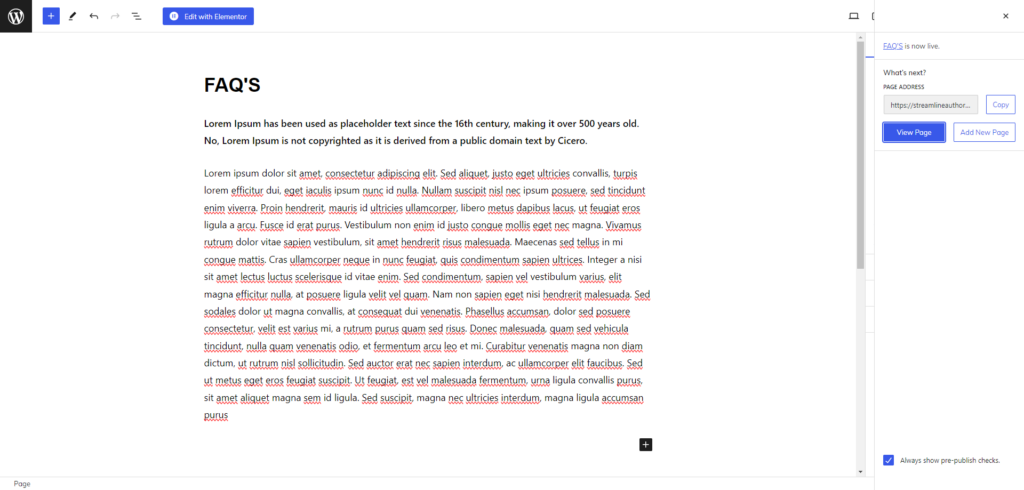
Step 1: Create a New Page
To initiate the process of adding an FAQ Section on Website without relying on plugins, the first step is to create a new page within your WordPress dashboard. Navigate to the “Pages” section and click on “Add New.” This action opens up the block editor, allowing you to craft a dedicated page specifically tailored for your FAQ content. Choose a title that accurately represents the purpose of the page, such as “FAQ” or “Help Center,” ensuring clarity for your visitors.
This new page will serve as the canvas for manually organizing and presenting your frequently asked questions, offering a personalized and hands-on approach to addressing user queries on your website.
Step 2: Format Content Using HTML
After creating a new page for your FAQ section in the WordPress dashboard, the next step involves structuring the content within the block editor using HTML. The utilization of HTML provides meticulous control over the appearance and structure of your FAQs. Each question is designated with a heading tag, such as <h2>, and its corresponding answer is encapsulated within a paragraph tag, <p>. This coding approach ensures a clean and well-organized presentation of information.
For instance:
<h2>Question 1</h2>
<p>Answer 1 goes here…</p>
<h2>Question 2</h2>
<p>Answer 2 goes here…</p>
In this example, each question is demarcated with a heading tag, emphasizing its significance. The subsequent paragraph tag contains the corresponding answer. This method not only enables precise control over the content’s layout but also establishes a structured hierarchy that enhances readability for visitors. As you proceed to create additional questions and answers, this manual coding approach sets the foundation for a customized and visually appealing FAQ section on website.
Step 3: Organize with Headings and Subheadings
Organizing your FAQs with clear headings and subheadings is a crucial step in enhancing readability and facilitating user navigation through the content. Utilizing HTML heading tags creates a logical hierarchy, making it easy for visitors to locate specific information. For instance, consider structuring your FAQ sections like this:
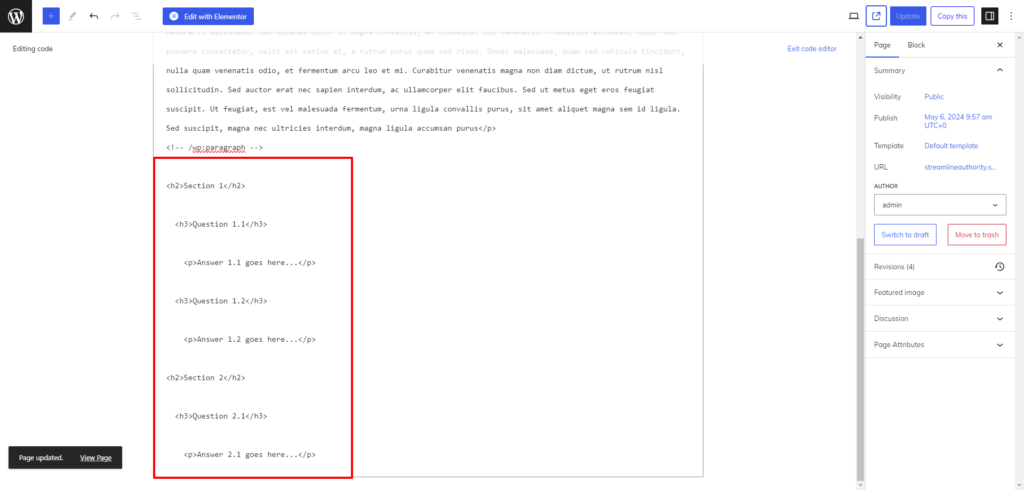
<h2>Section 1</h2>
<h3>Question 1.1</h3>
<p>Answer 1.1 goes here…</p>
<h3>Question 1.2</h3>
<p>Answer 1.2 goes here…</p>
<h2>Section 2</h2>
<h3>Question 2.1</h3>
<p>Answer 2.1 goes here…</p>
In this example, the <h2> tags represent the main sections, while <h3> tags denote specific questions within each section. This hierarchical structure not only aids in readability but also provides a visual roadmap for users to navigate the FAQ content effortlessly. As visitors scan through the sections and questions, the clear organization ensures a seamless and user-friendly experience, making it easier for them to find the information they are seeking.
Step 4: Enhance with CSS Styling
After structuring your FAQ section without relying on plugins, the next crucial step is to enhance its visual appeal through Elementor custom CSS styling. Utilizing the WordPress Customizer or an external stylesheet, you can precisely control the fonts, colors, spacing, and overall aesthetics of your FAQ content. The provided example CSS code serves as a starting point for customization:
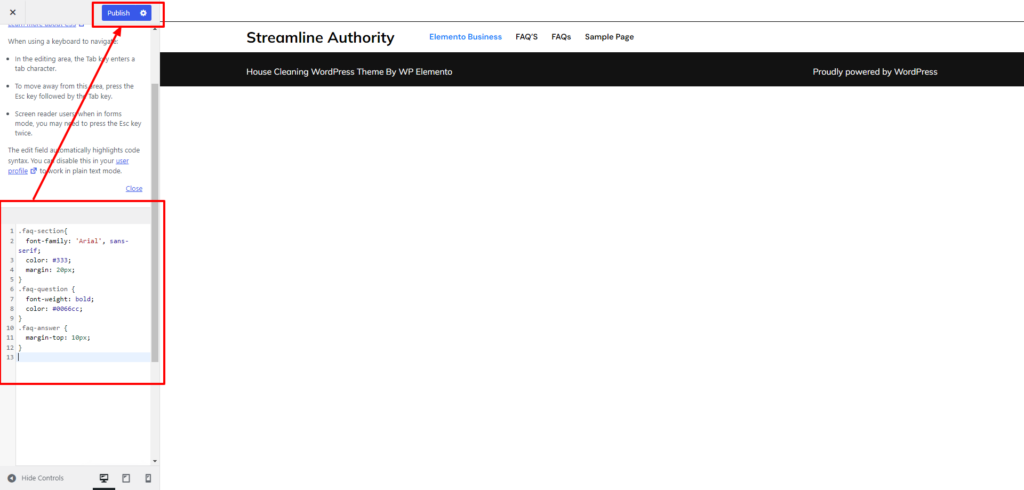
/* Custom CSS for FAQ Section */
.faq-section {
font-family: ‘Arial’, sans-serif;
color: #333;
margin: 20px;
}
.faq-question {
font-weight: bold;
color: #0066cc;
}
.faq-answer {
margin-top: 10px;
}
In this snippet, the .faq-section class defines the styling for the entire FAQ section on website, including the font family, text color, and margin. The .faq-question class styles the question text, emphasizing it with bold font-weight and a distinct color. Additionally, the .faq-answer class controls the spacing between questions and answers.
This customization allows you to harmonize the FAQ section with your website’s overall design, ensuring a seamless and cohesive user experience. Experiment with different styles to achieve the desired look, making your FAQ section visually engaging and user-friendly. Regularly test and refine the CSS to maintain a polished and consistent appearance across various devices and browsers.
Step 5: Add Accordion or Toggle Elements
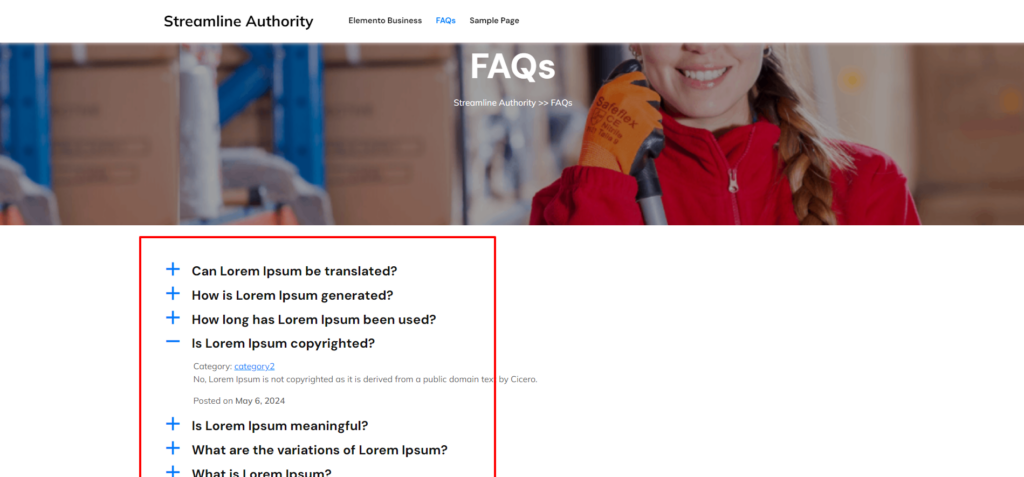
Incorporating accordion or toggle elements into your FAQ section significantly enhances the user experience by minimizing clutter and allowing users to focus on the questions they are interested in. These interactive elements enable visitors to expand or collapse individual questions and their corresponding answers with ease, streamlining navigation and improving accessibility.
To implement accordions or toggles manually, you can utilize HTML and CSS. Each FAQ item is encapsulated within a container (<div>) with a unique class identifier (“faq-item”). Within this container, the question (<h2>) serves as the trigger for the accordion or toggle, while the answer (<div>) remains hidden until activated. By clicking on the question, users can reveal the answer associated with it.
<div class=”faq-item”>
<h2 class=”faq-question”>Question 1</h2>
<div class=”faq-answer”>
<p>Answer 1 goes here…</p>
</div>
</div>
<div class=”faq-item”>
<h2 class=”faq-question”>Question 2</h2>
<div class=”faq-answer”>
<p>Answer 2 goes here…</p>
</div>
</div>
With this approach, visitors can navigate through the FAQ section effortlessly, expanding only the questions they want to see more about. This intuitive functionality promotes engagement and satisfaction, contributing to a positive user experience on your website.
Step 7: Publish and Regularly Update
Once you’ve finalized the design and functionality of your FAQ page, the next crucial step is to publish it on your website. Ensure easy access for visitors by adding a navigation link in your website’s menu, directing them to the FAQ section. This enhances user experience and encourages engagement with your content. Additionally, it’s essential to regularly update the FAQ section to keep pace with evolving information and address emerging queries. By incorporating new information and addressing common questions, you ensure that the content remains relevant and valuable to your audience.
This manual coding approach empowers website owners with extensive customization options, allowing them to tailor the FAQ experience to match the overall aesthetic and branding of the website. With regular maintenance and updates, the FAQ section serves its purpose effectively, providing users with the necessary support and guidance they seek.
Advantages of Manual Coding:
Challenges of Manual Coding:
The decision of which method to choose ultimately depends on the specific needs, resources, and preferences of the website owner.
While both methods offer advantages and challenges, the choice between plugins and manual coding should be based on the individual requirements and capabilities of the website owner.
In conclusion, we have explored two distinct methods for adding an FAQ Section on Website: Method 1 involves utilizing plugins, while Method 2 entails manual coding. Each method presents its own set of advantages and challenges. Plugins offer convenience, ease of use, and a variety of features, making them suitable for users with limited coding knowledge. However, they may introduce dependencies, limit customization options, and potentially impact website performance. On the other hand, manual coding provides complete control over design and functionality, allowing for extensive customization and optimized performance. Yet, it requires technical expertise, time investment, and ongoing maintenance.
Ultimately, the choice between the two methods depends on your specific needs, resources, and preferences. Whether you opt for the convenience of plugins or the flexibility of manual coding, incorporating an FAQ section is a valuable addition to your website, enhancing user experience and providing valuable information to your audience.
Premium WordPress themes and the WordPress theme bundle by WP Elemento offer comprehensive solutions for website development, including built-in FAQ sections. These themes are meticulously crafted with attention to detail, catering to the diverse needs of website owners across various industries. One of the key features of these themes is their versatility and flexibility, allowing users to easily customize and tailor their websites to their specific requirements. With the inclusion of pre-designed FAQ sections, users can quickly and effortlessly add this essential component to their websites, saving time and effort in the process. Additionally, the FAQ sections are designed to seamlessly integrate with the overall design aesthetic of the themes, ensuring a cohesive and professional look for the entire website. By providing built-in FAQ sections, Premium WordPress themes and the WP Elemento theme bundle empower users to enhance their websites with valuable information, improve user experience, and effectively address common queries and concerns of their audience.
