WordPress themes are a crucial component of any website, as they determine the overall look and feel of the site. However, as your website grows and evolves, you may find that your current theme no longer fits your needs. This could be due to a variety of factors, such as outdated design, poor performance, or lack of essential features. Whatever the reason may be, changing your WordPress theme is a simple yet effective way to breathe new life into your website and improve its functionality.
However, for those who are new to WordPress or have limited experience with web design, changing a theme can seem like a daunting task. The process may seem complicated, and you may be concerned about losing content or messing up the design of your site. But fear not! Changing a WordPress theme is much easier than you may think, and there are several methods that you can use to successfully switch themes without any hassle.
In this blog post, we will explore 2 easy methods to change your WordPress theme without causing any disruption to your site’s content or design. We will explain each method in detail and provide step-by-step instructions to help you successfully change your theme. By the end of this article, you will have the knowledge and confidence to change the theme of your WordPress site whenever you want, and you’ll be able to do so without any stress or confusion.
So, if you’re ready to give your site a fresh new look and feel, read on to learn more about the two easy methods to successfully change your WordPress theme. Whether you’re a seasoned WordPress user or a beginner, these methods are sure to make the process of changing your theme a breeze.
Why Change WordPress Themes?
There are several reasons why a WordPress user may choose to change their theme. Here are a few of the reasons most commonly cited:
- Design Refresh: One of the primary reasons to change WordPress theme is to give the website a fresh, updated look. Over time, a website can start to look outdated or stale, and changing the theme can help to give it a new lease of life. Changing the theme can also be a way to align the website’s design with current design trends or the brand’s updated identity.
- Better Functionality: Another reason to change WordPress theme is to gain access to new or better features and functionality. A new theme may offer better support for mobile devices, improved page speed and performance, or more customization options.
- Improved User Experience: A theme can play a significant role in the user experience of a website. A new theme may offer better navigation, layout, and visual hierarchy that can help users find what they are looking for more easily.
- Security and Updates: Older themes may not be updated as frequently as newer ones, which can leave them vulnerable to security breaches. Changing to a newer theme can help ensure that your website is up-to-date and secure.
- SEO Optimization: A theme can impact the SEO of a website. Changing to a new theme that is optimized for SEO can help improve the website’s search engine rankings.
- Change in website’s purpose: If the website’s purpose or focus has changed, it may be necessary to change the theme to better reflect the new direction. For example, a blog that has evolved into an e-commerce site may require a new theme with e-commerce functionality.
- Compatibility with Plugins: Not all themes are compatible with all plugins. If you have added a new plugin to your site and it doesn’t work properly with your current theme, you may need to change the theme to one that is compatible.
It is essential to carefully consider the reasons for the change and choose new WordPress elementor themes that fits the website’s needs and goals.
Things To Consider Before Proceeding To Change WordPress Theme
Changing WordPress themes can significantly affect your website’s design and functionality. Before you make the switch, here are some essential steps to ensure a smooth transition:
- Create a Backup of Your Site: Before making any significant changes to your website, it’s crucial to create a complete backup of your site. This backup will protect you against any potential data loss, and it can also serve as a restore point in case something goes wrong. You can Make a backup of your entire site using a plugin such as UpdraftPlus or BackupBuddy.
- Save Customizations: If you’ve made any customizations to your current theme, such as adding custom code or modifying the theme’s CSS, make sure to save them before you switch to a new theme. You can copy and paste the code into a text editor or use a plugin like Code Snippets to save custom code snippets.
- Save Widgets: WordPress widgets are a crucial part of your website’s functionality and design. If you’ve customized the widgets on your current theme, make sure to save them before you switch to a new theme. You can export your widgets using a plugin like Widget Importer & Exporter.
- Backup of Tracking Code: If you have any tracking code installed on your website, such as Google Analytics or Facebook Pixel, make sure to back it up before changing the theme. You don’t want to lose any data that you’ve collected through your tracking code.
- Sidebar Content: If your current WordPress theme has custom sidebar content, make sure to save a copy of it before switching to a new theme. You can simply take a screenshot or copy the content to a separate file. This will help you re-add any important widgets or custom content to your new theme’s sidebar.
- Check Theme Compatibility: Not all WordPress themes are created equal, and some themes may not be compatible with your current plugins or other features. Before you switch to a new theme, it’s essential to check its compatibility with your current setup. You can use a plugin like Theme Check or WordPress Theme Detector to test the compatibility of your current theme and the new one.
- Test the New Theme on a Staging Site: One of the best ways to ensure a smooth transition to a new theme is to test it on a staging site. A staging site is a clone of your current website, where you can make changes and test them without affecting your live site. You can use a plugin like WP Staging or Duplicator to create a staging site and test your new theme there.
- Set Up a Maintenance Page: While you are making changes to your website, it’s essential to keep your visitors informed. You can set up a maintenance page to let your visitors know that your site is undergoing changes and will be back soon. Here are the steps to set up a maintenance page:
- Create a maintenance page: Design a simple webpage that informs users about the maintenance and any other relevant information. The webpage should have a clear message, an apology for any inconvenience caused, and an estimated time for when the website will be back online.
- Upload the maintenance page: Upload the maintenance page to your website’s server. If you are using a WordPress as a CMS, you can use a plugin or theme that allows you to set up a maintenance page easily.
- Redirect users: To ensure that users are directed to the maintenance page when they try to access your website, you need to set up a redirect. You can do this by adding some code to your website’s .htaccess file or by using a plugin if you are using a CMS.
- Customize your error pages: You can customize your website’s error pages so that they display your maintenance page instead of the default error message. This will ensure that users who stumble upon broken links or pages that are not available are still directed to the maintenance page.
- Test everything: Before taking your website offline for maintenance, make sure to test everything to ensure that your maintenance page is working correctly, and users are redirected appropriately.
By following these steps, you can set up a maintenance page that will help to minimize the disruption caused to users during website maintenance.
2 Easy Methods To Change WordPress Theme
There are several methods you can use to change WordPress theme. Here are two commonly used methods.
Method 1: Change WordPress Theme Via The WordPress Dashboard
There are several ways to change WordPress themes, and one of them is manually WordPress Themes. To do this, the first step to changing a WordPress theme is to log in to the WordPress Dashboard. Once logged in, click on the “Appearance” tab located on the left-hand side of the screen. Next, click on the “Themes” option. This will bring up a list of all the themes currently installed on the website.
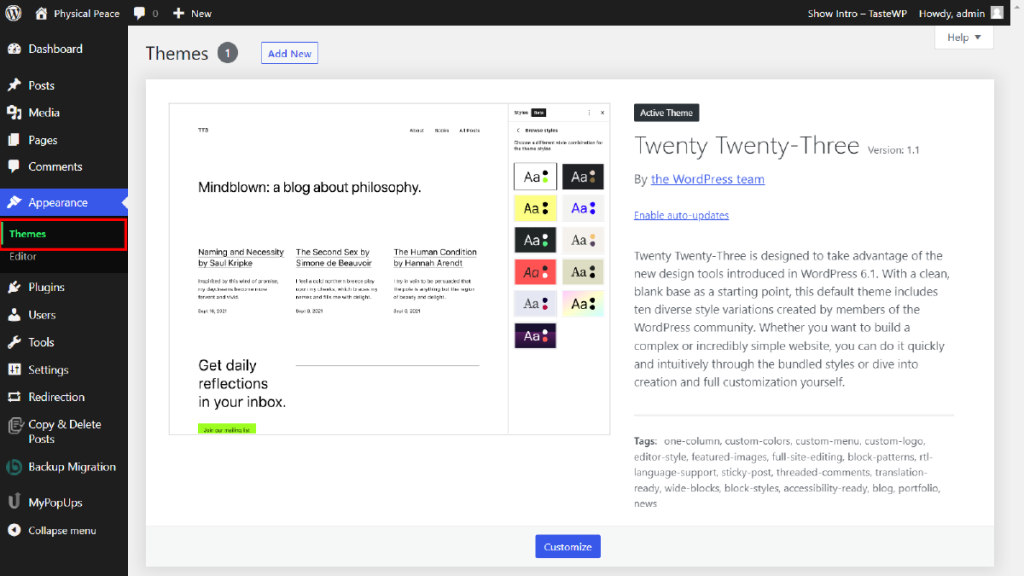
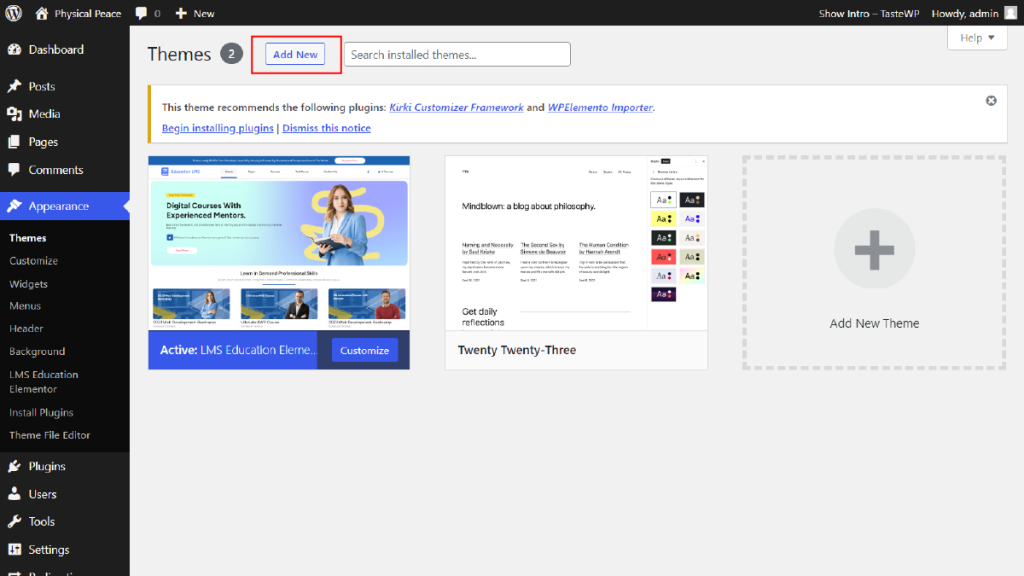
To find a new theme, click the “Add New” button at the top of the screen. This will bring up the WordPress theme directory, where you can browse and search for themes based on your preferences. You can also filter the themes by categories such as popular, latest, featured, and more.
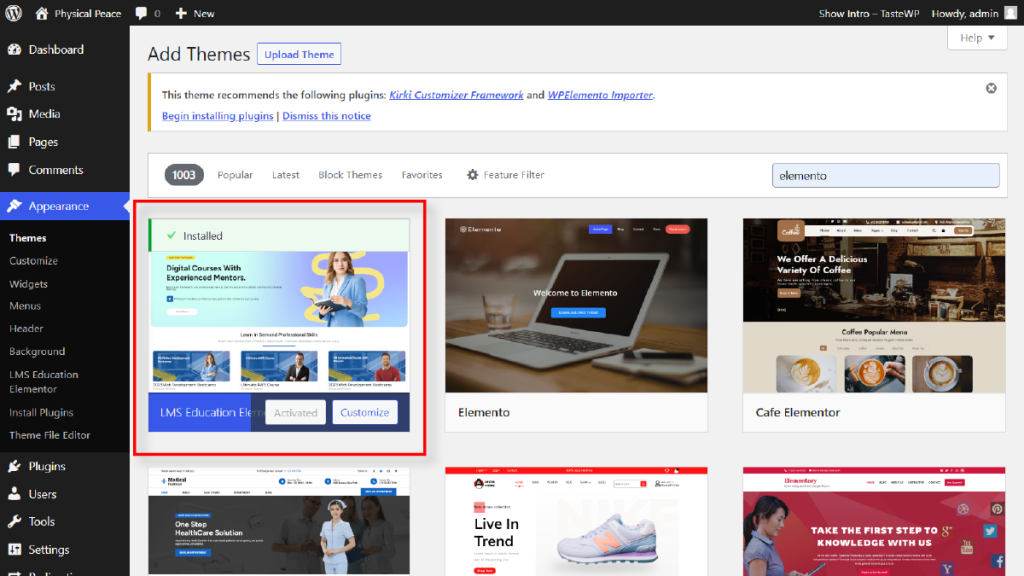
Click on the “Install” button once you have found a theme you like. WordPress will then download and install the theme on your website. Once the theme is installed, click on the “Activate” button to make it the new active theme on your website.
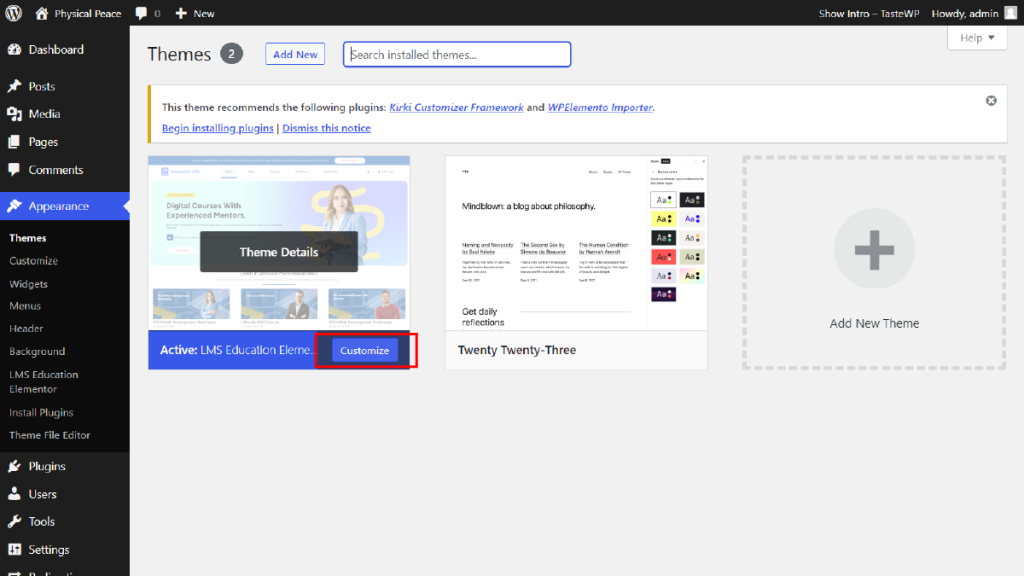
After activating the new theme, you can customize it by clicking on the “Customize” button. This will bring up the WordPress Customizer, where you can change various aspects of the theme such as the header, footer, fonts, colors, and more. Publish your changes by clicking “Save & Publish” once you are satisfied with them.
Overall, the process to change WordPress theme is a straightforward process that can be done via the WordPress Dashboard. By following the steps outlined in this method, you can easily find, install, and activate a new theme that will give your website a fresh new look.
Method 2: Change WordPress Theme Using FTP
Another method to Change WordPress theme is by using the Upload method with an FTP client. This method is useful when you have a custom theme that is not available in the WordPress theme repository or if you prefer to upload the theme manually.
To start, you need to have the FTP client software installed on your computer. There are many options available, but popular choices include FileZilla, Cyberduck, and WinSCP. Once you have installed the FTP client, connect it to your WordPress site by entering the hostname, username, password, and port number in the connection settings.
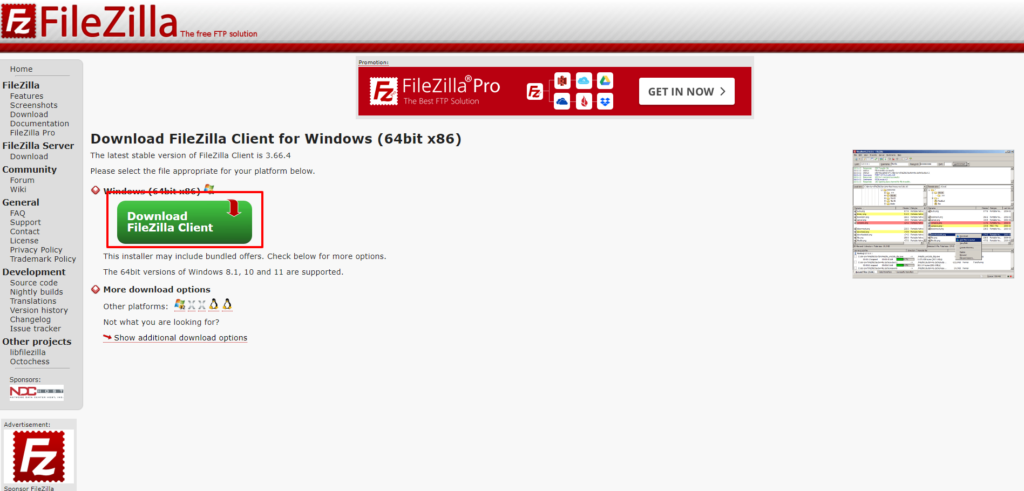
Next, you need to download the new WordPress theme from a reliable source and extract the theme files to a folder on your computer. Make sure to keep the original folder structure of the theme files intact. For instance, if the theme files are in a folder named ‘my-theme’, the files should be located in /my-theme/ folder on your computer.
Now, access the FTP client and navigate to the WordPress themes folder. The themes folder is located in wp-content/themes/. If you have multiple WordPress installations, make sure to select the correct folder for the site you want to update. Once you have located the correct folder, upload the extracted theme folder from your computer to the themes folder on the server.
After the upload is complete, log in to your WordPress admin dashboard, go to the Appearance section, and click on Themes. In the list of available themes, you can see the newly uploaded theme. Click on the theme thumbnail, and a live preview of the theme will be displayed. If you are satisfied with the preview, click on the Activate button to make the new theme your default theme.
Overall, the process to change WordPress theme using the Upload method with an FTP client requires a bit of technical knowledge, but it is a straightforward process. With the right tools and steps, you can switch to a new WordPress theme without losing any data or functionality on your site.
Things To Consider Doing After Changing A WordPress Theme
Changing your WordPress theme can significantly affect your website’s appearance and functionality. As such, there are some essential steps you need to take immediately after changing your WordPress theme to ensure your website runs optimally. Here are some critical things you should do after changing your WordPress theme:
Test Your Website thoroughly:
Testing your website thoroughly after changing your theme is essential to ensure everything is working as expected. You should start by visiting your website’s home page and checking all the links, buttons, and forms to see if they are functioning correctly. You should also test all the other pages on your website, including the blog pages, contact pages, and any other custom pages.
Check if the website’s layout and formatting are consistent across all pages. Ensure that your website’s content, including text and images, appears correctly and that the website’s navigation is intuitive and easy to use. Testing your website thoroughly will help you to identify any issues or errors that need fixing before they affect your visitors’ experience.
Cross Browser Compatibility:
Cross-browser compatibility is essential because different web browsers can display websites differently. After changing your WordPress theme, you should check your website’s appearance and functionality on different browsers such as Google Chrome, Mozilla Firefox, Safari, Microsoft Edge, and Opera.
You should also check your website’s compatibility with different versions of the same browser, as newer versions may not support certain features. Cross-browser compatibility testing will help you to identify any issues that may affect your website’s functionality or appearance on different browsers.
Add Tracking Code:
If you are using any analytics tools like Google Analytics or other tracking code, adding them to your website after changing the theme is essential. You can add tracking codes to your website by going to the theme options or using a plugin to add them to your website’s header or footer.
Adding a tracking code will help you to track your website’s visitors and their activities, such as the pages they visit, the time they spend on your website, and the actions they take. This information can help you to improve your website’s performance and user experience.
Test Loading Time and other aspects:
After changing your WordPress theme, you should test your website’s loading time and other aspects such as image optimization, caching, and page speed. You can use various online tools to test your website’s performance, such as Google PageSpeed Insights, GTmetrix, and Pingdom.
Optimizing your website’s loading time and other aspects, including Google Page Speed optimization, can significantly improve your website’s user experience and search engine optimization. Ensure that your website’s images are optimized for web use and that caching is enabled to reduce the time it takes to load your website’s pages.
Check for broken links:
Changing your WordPress theme can sometimes cause broken links on your website. Having broken links can negatively impact your website’s SEO and user experience. To check for broken links, you can use a tool like Broken Link Checker, which will scan your website and highlight any links that are not working correctly. Once you’ve identified broken links, you should either fix them or remove them from your website.
Verify your website’s SEO:
Changing your WordPress theme can affect your website’s SEO, so it’s crucial to verify your website’s SEO after making the change. To do this, you can use a tool like Google Search Console or SEMrush to check for any errors or issues that may affect your website’s ranking. You should also check your website’s meta tags, headings, and content to ensure that they are optimized for search engines.
Additionally, you should verify that your website is mobile-friendly and has fast page loading times, as these factors can also impact your website’s SEO. Once you’ve identified any SEO issues, you should address them to ensure that your website maintains its ranking and visibility.
Turn Off Maintenance Mode:
If you have activated maintenance mode before changing the theme, make sure to turn it off after completing the changes. This will ensure that your website is accessible to your visitors and that they can access your content without any restrictions.
You can turn off maintenance mode by going to your WordPress dashboard, clicking on the settings, and then selecting the “General” option. From there, uncheck the box next to the “Enable Maintenance Mode” option, and click on the “Save Changes” button.
Conclusion
In conclusion, the process to change WordPress theme may seem like a daunting task, but with the right approach and guidance, it can be done smoothly and without any hiccups. As we have seen in this article, changing your WordPress theme can give your website a fresh and updated look, but it’s essential to consider a few things before and after the process to ensure that everything runs smoothly.
Before you change your theme, make sure to back up your website, check for compatibility issues, and preview the new theme to ensure that it’s the right fit. Additionally, after changing the theme, take some time to review your website’s functionality, update any necessary plugins, and make sure that your site’s performance is not affected.
Finally, we have covered 2 easy methods to change every WordPress themes in the WordPress Theme Bundle – changing via the WordPress dashboard and changing using FTP. By following these methods and the considerations mentioned, you can successfully change your WordPress theme and elevate your website’s design and functionality.


