Providing seamless and secure payment options is paramount to ensuring customer satisfaction and boosting sales. As we step into 2024, the adoption of digital wallets continues to soar, with Apple Pay leading the charge. With a staggering 45.4 million users in the United States alone in 2023, Apple Pay has become a staple in the wallets of consumers across the nation.
For WordPress website owners using WooCommerce, the time is ripe to tap into this burgeoning market by integrating Apple Pay. This contactless payment method not only enhances the user experience but also instills confidence in customers through its robust security features.
In this blog, we will walk you through the step-by-step process of seamlessly incorporating Apple Pay for WooCommerce-powered WordPress website. From setting up your merchant account to customizing the checkout experience, we’ve got you covered. You’ll learn how to leverage the power of Apple Pay to streamline transactions, reduce cart abandonment, and ultimately elevate your online business to new heights.
So, if you’re an e-commerce entrepreneur, It’s time to tap, pay, and thrive in the world of online commerce. Let’s get started!
Why Apple Pay for WooCommerce?
Apple Pay for WooCommerce is a powerful payment integration that allows online merchants using the WooCommerce platform on their WordPress websites to offer customers a seamless and secure checkout experience using Apple’s digital wallet system. This integration leverages the widespread adoption of Apple Pay among consumers, enabling them to make purchases with just a touch or glance on their Apple devices, such as iPhone, iPad, Apple Watch, and Mac.
At its core, Apple Pay for WooCommerce works by securely storing users’ credit or debit card information within the Wallet app on their Apple devices. When purchasing on a WooCommerce-powered website that supports Apple Pay, customers can simply select the Apple Pay option at checkout. They then authenticate the transaction using Touch ID, Face ID, or their device’s passcode, eliminating the need to manually enter payment and Woocommerce shipping settings.
Now, let’s delve into the why Apple Pay for WooCommerce:
- Streamlined Checkout Experience: One of the primary advantages of incorporating Apple Pay into your WooCommerce site is the streamlined checkout experience it provides. With traditional payment methods requiring users to manually input their details, Apple Pay simplifies the process by allowing customers to complete transactions with just a touch or a glance. This frictionless checkout not only enhances user satisfaction but also significantly reduces the likelihood of cart abandonment, a common concern for online retailers.
- Enhanced Security Features: Security is paramount in the digital age, and Apple Pay is at the forefront of ensuring secure transactions. By utilizing biometric authentication methods like Touch ID or Face ID, Apple Pay adds an extra layer of protection, mitigating the risks associated with traditional payment methods. This reassures customers that their sensitive information is safeguarded, fostering trust and loyalty towards your WooCommerce store.
- Increased Conversions and Sales: The seamless and secure nature of Apple Pay contributes to a notable increase in conversions and overall sales. By simplifying the payment process, customers are more likely to complete their transactions, leading to a higher conversion rate. Additionally, the trust instilled by Apple Pay encourages users to explore and make purchases on your site, ultimately boosting your revenue.
- Accessibility to a Vast User Base: With Apple Pay’s widespread adoption, integrating this payment option expands your reach to a vast user base. In 2023, there were over 45.4 million Apple Pay users in the United States alone, and this number continues to grow globally. By offering a preferred and familiar payment method, your WooCommerce store becomes more accessible to a broader audience, including tech-savvy consumers who prioritize convenience.
- Reduced Cart Abandonment Rates: Cart abandonment is a persistent challenge for online retailers, often attributed to complex or time-consuming checkout processes. Apple Pay addresses this issue by providing a quick and efficient payment option. The simplicity of the payment process significantly reduces the chances of customers abandoning their carts before completing a purchase, leading to a more successful conversion funnel, for this you can also use Woocommerce Abandoned cart email in order to get your recovery of orders
- Compatibility with Multiple Devices: Apple Pay’s compatibility across various Apple devices, including iPhones, iPads, Macs, and Apple Watches, enhances the flexibility for users. This means that customers can seamlessly make purchases using Apple Pay regardless of the device they are using, promoting a consistent and user-friendly experience.
- Integration with WooCommerce: Adding Apple Pay to your WooCommerce store is a straightforward process. With dedicated plugins and extensions available, integration can be achieved with minimal effort. These plugins ensure that the checkout process remains cohesive with your site’s design while leveraging the benefits of Apple Pay seamlessly.
- Stay Competitive in the Market: In the competitive landscape of e-commerce, staying ahead of trends and adopting innovative technologies is crucial. Integrating Apple Pay positions your WooCommerce store as forward-thinking and customer-centric, giving you a competitive edge. As consumers increasingly seek convenience and security in their online transactions, offering Apple Pay can set your business apart from competitors.
Overall, integrating Apple Pay for WooCommerce is a strategic move that goes beyond merely adding a payment option. It transforms the user experience, enhances security, and opens doors to a broader customer base. As the digital payment landscape continues to evolve, embracing technologies like Apple Pay is not just beneficial; it’s becoming essential for the sustained success of your online business.
How to Add Apple Pay for WooCommerce?
Adding Apple Pay for WooCommerce on your WordPress website is a strategic move to enhance the payment experience for your customers. While there isn’t a direct Apple Pay plugin for installation, several plugins, including WooCommerce Stripe Payment Gateway, facilitate seamless integration. We’ll focus on using the WooCommerce Stripe Payment Gateway for Apple Pay integration, a widely used plugin with over 800,000 active installations and is one of the best ecommerce plugins for WordPress. Here are the detailed steps to add Apple Pay to your WooCommerce site:
Step 1: Install and Activate WooCommerce with WooCommerce Stripe Payment Gateway Plugin

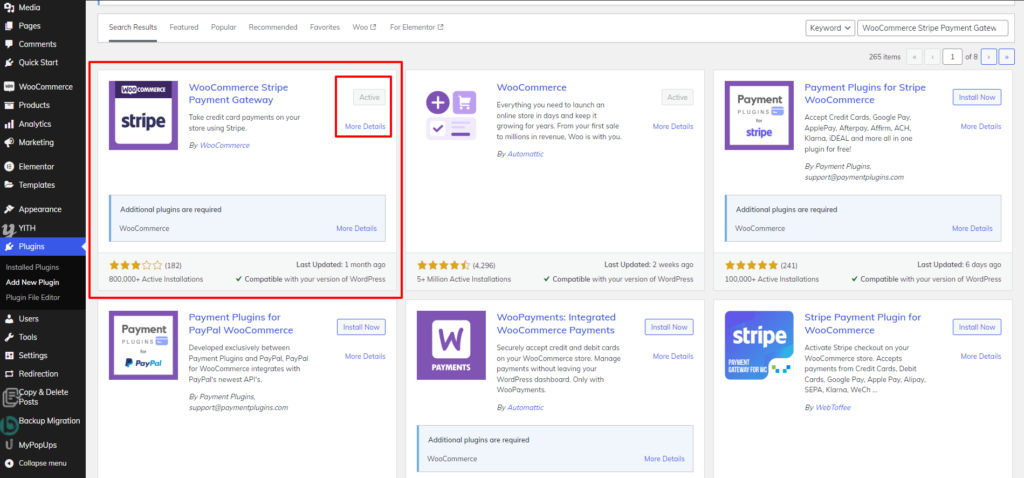
The initial step in adding Apple Pay for WooCommerce to your WordPress website involves installing and activating essential plugins. Commence by navigating to the Plugins section within your WordPress dashboard. Click on “Add New,” initiating the search for the pivotal “WooCommerce” plugin. Following its identification, proceed to install the plugin. Once the installation is completed, activate it to initiate the foundational framework for your online store.
The subsequent crucial component is the integration of the WooCommerce Stripe Payment Gateway plugin. Again, within the Plugins section, click on “Add New” and conduct a search for “WooCommerce Stripe Payment Gateway.” Upon locating the plugin, proceed with the installation. After installation, ensure to activate the WooCommerce Stripe Payment Gateway plugin. This tandem activation establishes the connection required for Apple Pay integration. With these plugins now installed and activated, your WordPress website is primed to delve into the subsequent steps for seamlessly incorporating Apple Pay into your WooCommerce-powered online store.
Step 2: Create an Account and Configure Basic Settings

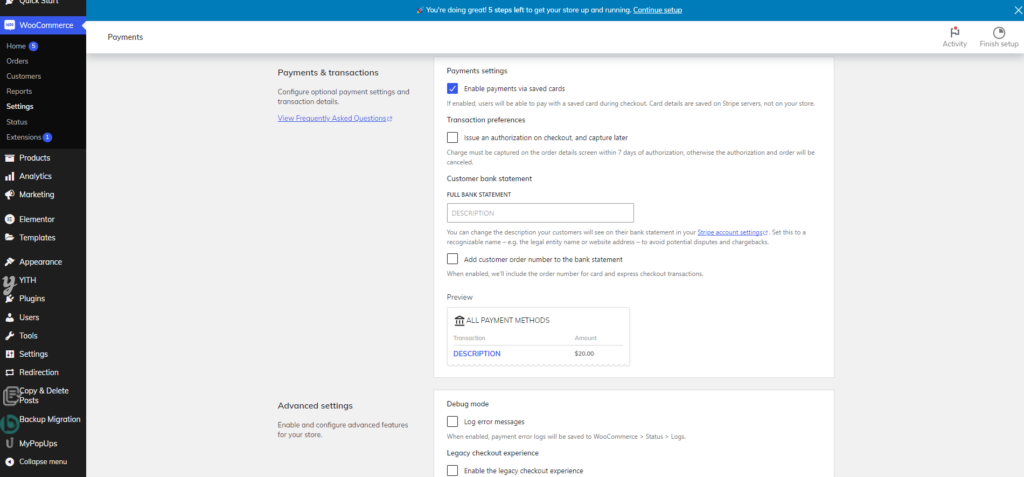
Once you’ve successfully installed WooCommerce and the WooCommerce Stripe Payment Gateway plugin, the next crucial step in adding Apple Pay for WooCommerce-powered WordPress website is creating an account and configuring basic settings with Stripe. To initiate this process, visit the official Stripe website if you haven’t already created an account. Upon completion of the registration, log in to your WordPress dashboard, proceed to WooCommerce, and navigate to Settings > Payments, where you’ll find the Stripe option.
Within the Stripe settings, a comprehensive set of fields awaits your attention to fine-tune your account. Start by entering fundamental details such as your business location, type, personal information, and website details. This information serves to create a seamless connection between your WooCommerce store and the Stripe Woocommerce payment methods. In addition to these particulars, you’ll be prompted to input your Social Security Number (SSN), a crucial step for identity verification purposes.
Configuring these basic settings ensures that your WooCommerce Stripe Payment Gateway is tailored to your specific business needs, providing a foundation for the subsequent steps in the Apple Pay integration process. This meticulous setup not only guarantees the security of transactions but also establishes a transparent and trustworthy payment environment for both you and your customers. Once these configurations are complete, you’ll be well-prepared to move on to the next stages, bringing you closer to successfully incorporating Apple Pay into your WooCommerce store.
Step 3: Set Up Apple Pay Payment

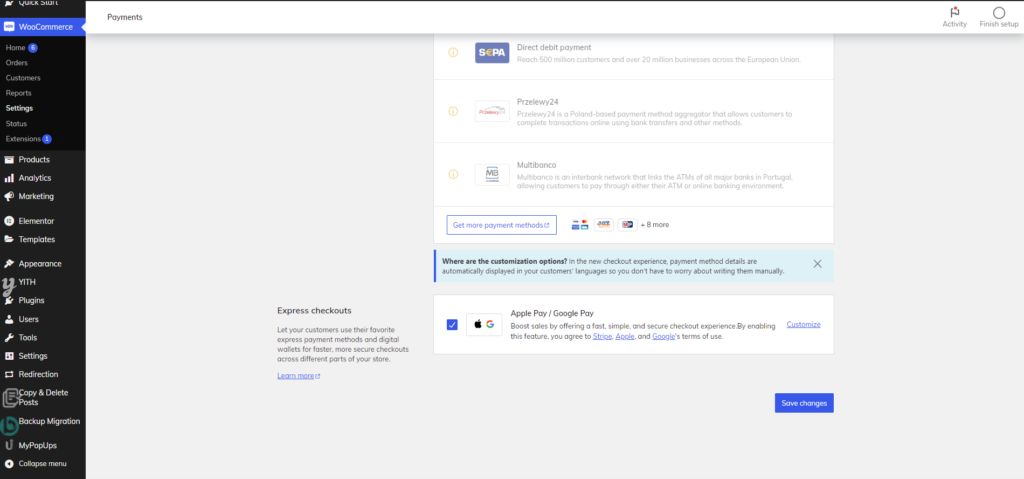
To set up Apple Pay for WooCommerce store, navigate to the WooCommerce Payment Settings and search for “Apple Pay (Stripe).” Click on “Set up,” initiating a seamless process that ensures a hassle-free integration of this popular payment option. Following the on-screen instructions, the first step is to register your domain, a crucial component to enable secure and authorized transactions.
After successfully registering your domain, proceed to enable the Apple Pay payment option. This action ensures that Apple Pay becomes visible as a payment method during the checkout process on your website. The integration with Stripe further streamlines this process, allowing you to accept payments not only securely but also conveniently through Apple Pay.
Now, delve into the configuration of essential General Settings. Tailor these settings to align with your business requirements and preferences. Specify the Title, a concise yet informative identifier for the Apple Pay payment option. Craft a Description that provides clarity to customers about the payment method. The Credit Card Display setting allows you to control how credit card details are presented during the checkout process.
Next, consider the Charge Type, where you can define whether the charge is immediate or deferred. Payment Sections allow you to choose the sections of the checkout process where customers can utilize Apple Pay. Adjust the Order Status to manage the status of orders processed through Apple Pay, ensuring seamless order tracking and fulfillment.
Beyond General Settings, further enhance the user experience by configuring Button Settings. Choose a Button Style that aligns with your website’s aesthetic, and define the Button Design to complement your overall design scheme. Tailor the Checkout button type, Cart button type, and Product button type to seamlessly integrate the Apple Pay option into different stages of the customer’s journey.
Once you’ve fine-tuned these settings to your liking, click on “Save Changes” to apply the configuration. This action ensures that the chosen preferences and options are implemented across your WooCommerce store, creating a cohesive and visually appealing integration of Apple Pay. With these steps completed, your online store is now equipped to offer customers a modern and secure payment experience through Apple Pay.
Step 4: Testing
Testing is a crucial step in the process of adding Apple Pay to your WooCommerce-powered WordPress website. Before making the integration live, it’s essential to ensure a seamless and error-free checkout experience for your customers. To do this, place a test order on your website, specifically focusing on the Apple Pay option during the checkout process. Verify that the Apple Pay button is prominently displayed and functions correctly, allowing users to complete transactions effortlessly. This meticulous testing phase helps identify any potential issues, such as payment processing errors or glitches in the user interface, allowing you to address them proactively.
By conducting thorough testing, you not only ensure a smooth experience for your customers but also uphold the integrity of your online store, fostering trust and satisfaction among users engaging with the Apple Pay feature. It’s a preemptive measure to guarantee that when real transactions occur, they unfold seamlessly, contributing to a positive user experience and successful conversions.
By following these steps, you’ve successfully integrated Apple Pay for WooCommerce on your WordPress website. This enhancement not only provides a modern and convenient payment option for your customers but also opens doors to a broader audience, including Apple users from various countries where Apple Pay is supported. Keep your online store at the forefront of e-commerce trends and provide a seamless checkout experience for your customers.
Conclusion
In conclusion, integrating Apple Pay for WooCommerce on your WordPress website is a pivotal step in enhancing the user experience and expanding your customer base. We’ve explored the significance of Apple Pay, the seamless integration process using WooCommerce Stripe Payment Gateway, and the steps to configure and test this powerful payment option. By offering Apple Pay, you not only streamline the checkout process but also cater to the preferences of millions of Apple device users worldwide.
For a seamless transition to a more advanced and user-friendly online store, consider exploring our best-selling WooCommerce-ready WordPress themes. Whether you’re in the business of shoes, education, car repair, biking, hiking, or running a cozy coffee shop, our WordPress Elementor themes are meticulously optimized for Elementor Woocommerce widgets, ensuring a visually appealing and high-performing online storefront. Elevate your e-commerce game, meet the demands of modern shoppers, and watch your business thrive with the integration of Apple Pay and our tailored WordPress themes.


